Profiteroles

Profiteroles

There is absolutely no “hidden tricks” when it comes to baking perfect profiteroles! Follow the instructions and you will have the satisfaction of perfect fresh profiteroles on your teatime table.

250ml boiling water
125ml butter, cubed
250ml cake flour
2,5ml salt
4 eggs
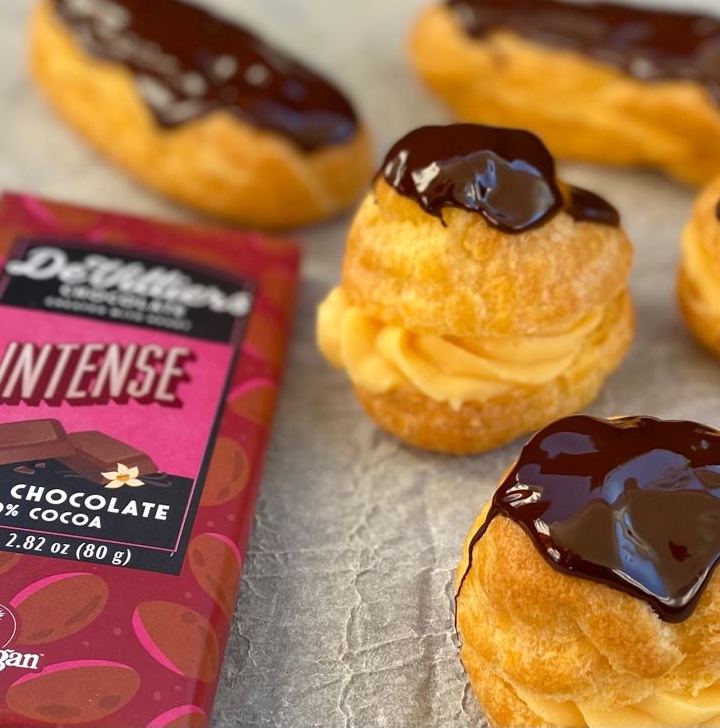
80g dark chocolate, melted
1 batch crème pâtisserie (search this blog for the recipe)

Preheat your oven to 190℃ and line a large baking sheet with baking paper.
Pour the water into a cast-iron/heavy-bottom saucepan and bring to a rapid boil.
Add the cubed butter and stir until melted.
Add the salt to the cake flour and then add it all to the saucepan with boiling water-butter, at once.
Stir vigorously with a wooden spoon until the mixture comes together in a ball in the centre of the saucepan.
Take the saucepan from the heat and add the eggs, one at a time.
Beat the mixture well. The egg should be completely incorporated before you add the next one. This is a real arm workout but do try and work quick as you need the steam from the heat!
Spoon a heaped teaspoon of the mixture on to the prepared baking tray, leaving enough space in between as the profiteroles expand quite a lot while baking.
Place in the oven and bake for 20 minutes.
Turn the oven temperature down to 160℃ and bake for another 20 minutes.
Take the tray from the oven and immediately slit a small sharp knife into the bottom of each profiterole, making as small a cut as possible, for the steam to escape.
Cool completely on a cooling rack.
Cut the profiteroles open and fill each of them with crème pâtissière (search the recipe on this blog: Custard Buns) or whipped cream.
Spoon some melted chocolate on to each filled pastry and set aside for the chocolate to set.
Serve with a smile!

Banana-Caramel Muffins

Banana-Caramel Muffins

This is a recipe for banana-bran muffins that belong on the breakfast/brunch table but if you want to add some decadence …. well, this caramel sauce does exactly that without overpowering! Yields about 16 muffins.

For the muffins:
300g cake flour
100g bran flakes
300g brown sugar
1,2ml salt
50ml cultured buttermilk
15ml bicarbonate of soda
450ml cultured buttermilk
2 eggs
100ml vegetable oil
5ml vanilla essence
250ml mashed banana
about 3 extra bananas

Preheat your oven to 180℃ and line a 12-hole muffin tin with paper cups.
Add the cake flour, bran flakes, brown sugar and salt to a mixing bowl, stir through and set aside.
Pour the 50ml buttermilk into a small bowl and add the bicarbonate of soda to it. Stir through and set aside.
Add the 450ml buttermilk, eggs, vegetable oil and vanilla to a wide-mouth jug and whisk together by hand.
Pour the buttermilk-bicarbonate mixture into the liquid mixture and stir through.
Pour the liquid ingredients into the bowl with the dry ingredients.
Add the mashed banana and mix together until JUST mixed through.
Spoon the batter into the prepared muffin tins. At this stage I like to add another piece of banana of about 4 cm, which I simply place on top of the muffin batter.
Bake the muffins for 18 – 20 minutes and cool on a cooling rack

For the caramel sauce:
250ml sugar
60ml butter
a pinch of salt
125ml cream
15ml vanilla

Add all the ingredients to a small saucepan over low heat.
Stir together with a whisk until the butter has melted and the sugar has dissolved.
Simmer the sauce over a medium heat while whisking continuously until the sauce thickens. This will take about 8 minutes.
Take the caramel sauce from the heat and allow to cool for 10 minutes – the sauce will thicken more as it cools down.
Spoon the warm caramel onto the muffins and serve.

Tropical Tapioca Dessert

Tropical Tapioca Dessert

Easy, comforting and an absolute crowd pleaser!!

2 tins of coconut milk
100ml milk
250ml tapioca
a pinch of salt
83ml sugar
83ml butter
4 eggs
5ml vanilla
6 fresh guavas
83ml coconut shavings

Preheat your oven to 180℃ and grease a 18cm X 28ccm ovenproof dish.
Pour the 2 tins of coconut milk and the 100ml of milk into a saucepan and bring to the boil.
Add the tapioca and salt to the milk, turn the heat down to low and gently simmer for 25 minutes. Stir the mixture every now and then to prevent the tapioca from clotting and sticking to the saucepan.
Remove the saucepan from the heat and stir in the sugar and butter.
Add the eggs and vanilla to a mixing bowl and whisk together.
Pour the egg mixture into the tapioca while stirring.
Pour the mixture into the prepared baking dish.
Peel the guavas and randomly press them into the tapioca.
Place in the oven and bake for 45 minutes.
Sprinkle the warm dessert with coconut shavings and serve with pouring custard.

Chocolate Bread-and-Butter Pudding

Chocolate Bread-and-Butter Pudding

This is the perfect make-ahead dessert when entertaining as it needs to rest in the refrigerator for 24 hours before baking. With its crunchy outside top and soft, squidgy inside it is best served in small portions as it is very rich. Leftovers are equally good when cold!

10 slices white bread, 0,5cm thick
160g dark chocolate, chopped
75g butter
450ml cream
60ml dark rum
110g caster sugar
a pinch of cinnamon
3 eggs
extra pouring cream for serving

Grease a 18cm X 28cm ovenproof ceramic dish.
Remove the crusts from the bread slices and then cut each slice into 4 triangles. Set aside.
Add the chocolate, butter, cream, rum, sugar and cinnamon to a heatproof bowl set over a saucepan of barely simmering water.
Stir the mixture every now-and-then until the butter and chocolate has melted and the sugar has dissolved.
Remove the bowl from the heat and give it a good stir to amalgamate the ingredients. Put aside.
Add the eggs to a large mixing bowl and whisk together.
Pour the chocolate mixture over the eggs in a thin stream while whisking continuously. Remember: pour slowly, whisk quickly.
Spoon a 1cm layer of chocolate mixture into the base of the baking dish and arrange half the bread triangles in overlapping rows on this chocolate layer.

Pour half of the remaining chocolate mixture as evenly as you can, over the bread.
Arrange the rest of the triangles on top of this layer, finishing off with a layer of chocolate.

Gently press down the bread with a spoon so that it gets covered evenly with the liquid as it cools.
Cover the dish with plastic wrap and allow to cool completely. Place the dish in the refrigerator for 24 hours.

Cooking the pudding:
Preheat your oven to 180℃.
Remove the plastic wrap and bake the pudding for 35 minutes.
Allow to stand for 10 minutes before serving with pouring cream, custard or ice cream.


Chocolate Pancakes

Chocolate Pancakes

These pancakes are not cocoa-chocolatey-looking but actually contain real chocolate in the batter!! Whether you serve them with ice-cream, fresh fruit and Chantilly cream or plain, from-the-pan, you will love them! Yields about 12 pancakes depending on the size of your pan.

80g dark chocolate, 70% cocoa
250ml + 100ml milk
90ml caster sugar
200g cake flour
100ml water
3 eggs
2,5ml vanilla
butter for frying

Chop the chocolate into small pieces and add it to a small saucepan.
Pour in 100ml milk and place on a very low heat.
Stir the mixture until the chocolate has melted completely and remove from the heat.
Add the 250ml milk and caster sugar and stir to dissolve the sugar. Set aside.
Sift the flour into a mixing bowl.
Pour the water, eggs and vanilla into a jug and whisk it together.
Pour the egg mixture into the flour in a very thin stream while whisking. Pour slowly, whisk quickly …. you don’t want lumps in your batter!
Now whisk in the chocolate mixture in the same way.
Cover the batter with a tea towel and allow to stand for one hour.

Heat a frying/crêpe pan until it is very hot.
Add a knob of butter and swirl it around so that it covers the surface of the pan.
Pour in a ladleful of batter and swirl again to evenly distribute in the pan.
Turn the heat down slightly and cook the pancake for 1 minute.
Turn the pancake over with a spatula and cook for another 30 seconds. (The combination of sugar and chocolate burns really easy!!)
Keep going with the rest of the batter until you have a heavily stack of chocolate pancakes.
Serve warm.

Chocolate Pots

Chocolate Pots

This traditional dessert, also known as Pots de Crème, is super easy to make. It is a rich and creamy no-bake dessert and most of all, it is deliciously smooth and not airy like a mousse. I serve this dessert in espresso cups as I find a larger serving too rich and overwhelming. This recipe yields 10 espresso-cup servings or 6 individual servings in standard ramekins.

250ml cream
100ml milk
160g dark chocolate, minimum 70% cocoa, chopped
40g brown sugar
3 egg yolks
5ml vanilla

Pour the cream and milk into a saucepan and slowly bring it to a simmer.
Take the saucepan from the heat the moment it starts to simmer.
Add the chopped chocolate and stir the mixture until the chocolate has melted completely.
Add the sugar, egg yolks and vanilla to a mixing bowl and whisk with electric beaters until pale and fluffy.
Drizzle the chocolate mixture onto the egg mixture, whisking continuously. Remember: pour slowly, whisk quickly! Keep going until you have added all of the chocolate mixture.
Divide the mixture between ramekins/espresso cups and allow to cool completely.
Place the cups on a baking sheet and cover with plastic wrap. Refrigerate for at least an hour or until you are ready to serve.
I serve my chocolate pots as they are but this dessert is often served with Chantilly cream.

Crêpes Suzette

Crêpes Suzette

This is one of my favourite French desserts and really easy to make. Make the crêpes the day before you need them and simply reheat them in the orange-caramel-syrup before serving.

Crêpes:
750ml cake flour
2,5ml baking powder
5ml salt
500ml milk
250ml water
125ml sunflower oil
4 eggs

Orange sauce:
45ml caster sugar
250ml orange juice
the zest of one orange
5ml lemon juice
15ml brandy
50g butter, cubed

For the crêpes:
Add the flour, baking powder and salt to the bowl of a stand mixer fitter with the whisk attachment.
Whisk the milk, water, oil and eggs together in a separate wide-mouthed jug.
Turn the mixer on to a low speed and add the liquid ingredients in a very thin stream. Keep whisking and pouring until all the liquid has been added.
Turn the mixer on to a higher speed and whisk for at least two minutes.
Remove the bowl from the mixer, cover with plastic wrap and allow to stand for 1 hour.
Heat a crêpe pan/frying pan until hot. Add a small amount of vegetable oil and swirl it around the pan. Pour the oil out and put the pan back onto a medium-high heat.
Spoon a ladle-full of the batter into the pan and cook until small holes appear over the entire surface of the crêpe.
Flip the crêpe and cook for 1 minute on the other side.
Slide the cooked crêpe onto a plate and continue baking the rest.

For the orange sauce:
Tip the caster sugar into a non-stick frying pan on medium to low heat.
Allow the sugar to melt without stirring it. You want the sugar to turn a caramel colour without burning it – watch it like a hawk and do not walk away from it!
Take the pan from the heat when the sugar is brown enough and add the orange juice, orange zest, lemon juice and brandy.
Return the pan to a very low heat. Do not panic if the sugar has seized, continue heating over a low heat and stir lightly until the sugar has dissolved completely.
Now start adding the butter, one or two cubes at a time while stirring constantly. Keep going until you have incorporated all the butter.
Bring the mixture to the boil, turn down the heat and simmer until the sauce has thickened slightly and has a lovely gloss to it.

Fold each crêpe into half, and then fold it again so that you have a more-or-less triangular shape.
Gently slide the folded crêpe into the pan and spoon the sauce over it.
Serve immediately.

Chocolate and Pear Tart

Chocolate and Pear Tart

Chocolate and pear is a match made in heaven and with this delicious chocolate pastry as a base, few desserts will be able to compare to this tart!

Poached pears:
3 ripe pears
750ml water
250ml sugar
15ml lemon juice

Chocolate pastry:
80g dark chocolate, at least 70% cocoa
175g butter, cubed
230g caster sugar
4 egg yolks
10ml vanilla
15ml milk
50g cocoa powder
350g cake flour

Chocolate frangipane:
120g dark chocolate, at least 70% cocoa
120g butter, cubed
120g caster sugar
5ml vanilla
2 eggs
125g ground almonds
25g flour

Poaching the pears:
Pour the water into a small saucepan and add the sugar and lemon juice.
Turn the heat on to medium and stir until the sugar has dissolved.
Peel, halve and core the pears and add to the poaching liquid.
Cut a square of baking paper that is large enough to cover the saucepan. Scrunch the paper up and then slide it down into the saucepan until it touches the poaching liquid.
Bring the poaching liquid to the boil, reduce the heat and simmer gently until a wooden skewer can easily be inserted into the pear quarters.
Turn off the heat and allow the fruit to cool in the poaching liquid.
Remove the pear once it has cooled and keep aside.
Simmer the poaching liquid until it reduces to a syrup. Reserve this to glaze the tart with once it comes from the oven.

For the chocolate pastry:
Chop and melt the chocolate in a heatproof bowl set over a saucepan of simmering water, making sure that the bottom of the bowl is not in contact with the water.
Stir until silky smooth and completely melted.
Take the bowl from the heat and allow to cool slightly.
Add the cubed butter, sugar, egg yolks, vanilla and milk to the bowl of a food processor and blitz together.
Pour in the slightly cooled chocolate and pulse to blend in.
Sift the cocoa powder and flour into the chocolate mixture and blitz until the mixture comes together in a smooth ball of pastry.
Wrap the pastry with plastic wrap and store in the refrigerator for one hour.

Lightly spray a tart tin with baking spray.
Roll the pastry to a thickness of 3mm and line the baking tin on the bottom and sides.
Place the pastry case into the freezer for 1 hour.

Preheat your oven to 180℃.
Line the pastry case with baking paper and baking beans and bake for 15 minutes.
Set aside to cool.

For the chocolate frangipane:
Keep your oven on 180℃.
Melt the chocolate in a heatproof bowl set over a saucepan of simmering water, making sure that the bottom of the bowl is not in contact with the water. Stir until completely melted. Remove from the heat and set aside to cool slightly.
Add the butter and sugar to the bowl of a stand mixer fitted with the paddle attachment.
Cream the butter and sugar until light and fluffy.
Add the vanilla and the eggs and beat together, scraping down once or twice, until well blended.
Add the almonds and flour and fold into the egg mixture with a spatula.
Pour in the melted chocolate and stir once again to incorporate, with the spatula.
Spread the frangipane mixture onto the baked pastry case.
Slice the pears and position each sliced half onto the chocolate frangipane, spacing it so that there is enough space for all of the pear.
Bake the tart for 45 minutes.
Remove from the oven and brush the reduced poaching liquid (syrup) onto the warm tart.
Allow to cool in the baking mould.
Serve with a sprinkling of icing sugar or a scoop of vanilla ice cream.

Middle-Eastern Rice Pudding

Middle-Eastern Rice Pudding

This is fragrant dessert with rose water and honey and is based on the traditional Roz bel Laban. The recipe provides 6 generous portions depending on the size of the glasses or bowls it is served in.

500ml milk
250ml cream
2 cinnamon quills
6 cloves
1,2ml ground cardamon
250ml rice
30ml sugar
500ml water
83ml condensed milk
30ml butter
30ml rose water
honey and pistachio nuts to serve

Add the milk, cream, cinnamon, cloves and cardamon to a saucepan.
Turn the heat on medium and wait for the mixture to come to the boil.
Turn the heat down so that the mixture simmers and add the rice, sugar and water.
Allow the mixture to simmer until the rice is cooked, stirring continuously. This will take 30 – 40 minutes. Do not leave the mixture – keep an eye on it!
Take the saucepan from the heat and add the condensed milk, rose water and butter. Stir thoroughly.
Spoon the rice pudding into glasses or serving bowls.
Drizzle each dessert with honey and a sprinkling of pistachio nuts.
The rice pudding is best served warm.

Biscuit Brownies

Biscuit Brownies

This is an old favourite which most of us have eaten in one form or the other. The addition of the chocolate layer on top adds a creaminess and turns a kids-party-favourite into an adult snack! Keeps well in a sealed container at room temperature.

2 X 200g packets plain biscuits
250g butter
60ml condensed milk
30ml golden syrup
45ml cocoa powder, sifted
30 sugar
160g dark chocolate; I used De Villiers Dark Chocolate, Intense
160g white chocolate; I used De Villiers White Chocolate, Raspberry, Vanilla and Almonds

Line two 20cm X 20cm baking tins with baking paper.
Put the biscuits into a plastic bag and crush them with a rolling pin. Pour the biscuit pieces into a large mixing bowl.
Add the butter, condensed milk, syrup, cocoa powder and sugar to a small saucepan and melt together over a low heat.
Stir the mixture until completely smooth and amalgamated.
Pour the runny mixture onto the biscuit pieces and mix well, making sure that all the pieces are covered in it.
Divide the mixture between the two prepared baking tins and smooth the top with the back of a spoon. Press down to compact the mixture.
Refrigerate for 10 minutes.
Chop the dark chocolate into small pieces and add it to a heatproof bowl that sits on a saucepan of simmering water. Stir every now and then until the chocolate is melted. Pour onto one of the baking tins with brownies.
Repeat the process with the white chocolate and pour over the other batch of brownies.
If you want to prettify the brownies with edible flowers, now is the time!
Place the two baking tins in the refrigerator for 30 minutes.
Slice before serving.