Energy Treats

Energy Treats

These energy balls are a healthy mid-afternoon treat and will keep your energy levels right up there where you need it. Apart from having no sugar, it is also vegan, vegetarian, dairy-free and gluten-free. Makes about 20 balls, depending on the size.

8 Medjool dates, pitted

100g almond meal

30ml cocoa powder

45g desiccated coconut, plus extra to roll the balls in

Line a baking tray with baking paper.

Place the dates in a small bowl and cover with boiling water.

Leave to soak for 30 minutes so that the dates can soften.

Drain.

Add the almond meal, dates, cocoa powder and coconut to a food processor and blitz together until combined.

The mixture should be sticky but if it is too thick, add 1 – 2 tablespoons water and blitz again.

Wet your hands to prevent the mixture from sticking to it. Roll heaped teaspoons of the mixture into balls. Place on the baking paper and refrigerate for 30 minutes to firm up.

Take the balls out of the fridge and lightly roll each in some extra coconut, to coat the outside.

Store the energy balls in a glass jar and keep it in the fridge.

Will keep for 2 – 3 days.

Focaccia

Focaccia

This flat Italian yeast bread is the star of the bread show as far as I’m concerned. It is soft and chewy at the same time, cradling olive oil into it’s dimples and ever ready to soak up whatever flavours are added to it. Traditionally a focaccia has rosemary, olive oil and salt as a topping but this need not be so. It is absolutely delicious with tiny, sun-ripened tomatoes, herbs, pesto, caramelised onion, roasted veg, cheese and olives and if you have a sweet tooth, chocolate, fruits and nuts.

I like to make what I call a filled focaccia: two rounds of bread, stacked upon each other, with the centre filled to capacity with whatever filling I have around on that particular day. Apart from being perfect picnic food this makes a wonderful meal with a salad or two added on the side.

Basic focaccia dough:

500g flour

10g dry yeast

340ml lukewarm water

10g sugar

10ml salt

20ml olive oil

Pour the lukewarm water into a jug and sprinkle the yeast on top.

Add the sugar, salt and olive and give the mixture a really good stir.

Add your flour to the bowl of a stand mixer fitted with the dough hook.

Turn the machine onto low speed and add the yeast mixture while the engine is running.

Once the mixture comes together as a dough, turn the machine onto medium speed and knead for 4 minutes, until you have a smooth and elastic dough.

Lightly oil a mixing bowl and place the dough into it. Cover with a damp tea towel and leave to prove for an hour or until almost doubled in size.

Preheat your oven to 180℃.

Knock the dough back by kneading it by hand for 2 minutes.

Divide the dough in to equal pieces and roll each piece into a circle shape with a rolling pin.

Push the tips of your fingers into the dough circles so that it forms indents or dimples.

Drizzle olive oil over the discs of dough and scatter with coarse salt and rosemary.

This is the time to add whatever filling you want to the one disc that will make out the bottom part of your filled focaccia.

Place one disc on top of the other.

Leave to prove until puffy.

Chicken Piccata

Chicken Piccata

This Italian dish is an easy, quick, delicious meal, loved by my entire family. The traditional veal scaloppini is easily replaced with chicken and is sensational when smothered in this very basic piccata sauce. To me the marriage of lemon, capers and butter represent pure indulgence. Paired with a crisp chardonnay and shared on the patio on balmy evenings, this is one of those meals that leaves me grateful and at peace with the world…

4 skinless chicken breasts

125ml flour

30ml olive oil

30ml butter

For the sauce:

62ml butter

25ml flour

125ml white wine

62ml lemon juice

62ml chicken stock

45ml capers

30ml parsley

Pound the chicken breasts to an even thickness with a rolling pin. If you have really big breasts you may cut them horizontally to have thinner pieces. The idea is for the meat to be the same thickness so that it cooks evenly and quickly in a pan.

Season the 125ml flour with salt and pepper and dredge the chicken breasts in it.

Add the olive oil and butter to the pan.

Fry the chicken for 2-3 minutes per side, remove from the pan and keep warm.

To make the sauce:

Melt the butter and flour in the pan that you used to fry the chicken.

Whisk together in the saucepan while cooking for about 2 minutes.

Add the chicken stock while whisking continuously.

Once blended, add the lemon juice and white wine.

Stir in the capers and parsley and season to taste with salt and pepper.

Return the chicken to the pan and heat the scallopini in the sauce.

Serve warm with pasta or buttery mashed potatoes.

The addition of a salad and a crusty bread, makes for a perfect meal.

Carrot and Pineapple Cake

Carrot and Pineapple Cake

This recipe is from a handwritten recipe book I bought many years ago at a church bazaar in a town called Smithfield, which is located in the true South African platteland. I have often wondered who the owner of the book was; this person with the neat, clear print and an obvious love for food. The pages are yellow and quite brittle and in some places there are traces of oils spilled onto the paper. The book and its many recipes tell a story of a life lived around food; as nourishment and a daily necessity, of preserving the abundance of the vegetable garden, and a life filled with cooking and baking in order to bring joy to others. This carrot and pineapple cake represents the author of this special book. It is filled with nourishment, deliciousness and one of the very best cakes I have ever eaten. Bake it as an ode to the mysterious writer of this very special book. May you enjoy preparing and eating it as much as I do.

625ml cake flour

10ml baking powder

7,5ml bicarbonate of soda

15ml mixed spice

5ml salt

375ml brown sugar

310ml sunflower oil

62,5ml smooth apricot jam

4 eggs

500ml grated carrot

1x 440g tin of crushed pineapple, drained (or 250ml of fresh pineapple, blitzed and drained)

125ml pecan nuts, roughly chopped

Preheat your oven to 190℃.

Sift the cake flour, baking powder, bicarbonate of soda, mixed spice and salt into a bowl.

Beat the sugar and oil in a stand mixer with the paddle attachment, until well blended.

Add small amounts of the apricot jam to the mixture while running the machine on a medium speed.

Add the eggs one by one. Once the eggs are incorporated, run the mixer on high speed for about 2 minutes.

Add the carrot, pineapple and nuts and mix well on a low speed.

Take the bowl from the mixer and sift the dry ingredients over the wet mixture. Fold the two mixture together with a spatula until well blended.

Grease a 28cm tube cake tin and sprinkle with dry breadcrumbs to coat the inside surface.

Pour the mixture into the prepared tin and bake for 45 minutes. Test the cake to see if its done by inserting a wooden skewer into the centre. If the skewer comes out clean the cake is done, if not, put the cake back into the oven for another ten minutes or so.

Once you have taken the cake from the oven, allow it to firm and cool in the cake tin for 10 minutes before turning it out onto a wire rack to cool.

This cake is moist and fresh and needs nothing more added to it, however, I do sometimes make a mixture of icing sugar and lemon juice to pour over it. Feel free to add a classic cream cheese icing if you wish and a sprinkling of pecan nuts to round it off.

Chocolate Tart

Chocolate Tart

I’m not saying anything….just try it!

For the base:

300 – 350g chocolate biscuits (Romany Creams if you want a brown/chocolate base and if you don’t have it or don’t mind the base not being chocolate, something like Tennis Biscuits or Digestives)

80g butter, melted

Break up the biscuits and put them into a plastic bag. Take a rolling pin and bash them into very fine crumbs. (This is great to get rid of your frustrations but you may also blitz the biscuits and melted butter together in a food processor if you are lucky enough not to be frustrated… you know, with lockdown, etc)

Add the biscuit crumbs into the bowl with the melted butter and mix thoroughly.

Scrape the mixture into a 24cm tart tin, with a removable base.

Spread it evenly so that there is enough to go up the sides of the tin and then press it all down into a uniform crust. Refrigerate the base while you prepare the filling.

For the filling:

500g mascarpone

300g dark chocolate, or half milk chocolate and half dark chocolate

Beat the mascarpone in a stand mixer with the paddle attachment, to soften it.

Break the chocolate into small pieces and put it in a glass bowl.

Place a small saucepan over a low heat and fill it to about 5cm depth with water. Turn on the heat and bring to a gentle simmer.

Now place the glass bowl with the chocolate on top of the saucepan and gently melt the chocolate. You may stir the chocolate every now and then.

Turn the mixer with the mascarpone onto a low speed and slowly add the melted chocolate.

Scrape the mascarpone-chocolate filling into the cold tart base and place back into the refrigerator for two hours.

Decorate as you wish or celebrate the fabulous simplicity of tastes!

René’s Marmite Cakes

René’s Marmite Cakes

My friend Rene Smuts gave me this recipe which in its original state should be baked as one large cake. I bake my marmite cakes in a twelve hole muffin tin so that everyone in my family knows EXACTLY how many cupcakes each of us may eat to make the divide fair, and yes, they really are thát delicious!!

These little cakes are great for breakfast, brunch, lunch or whenever the savoury cravings hit!

For the cupcakes:

75g butter

160g sugar

1 egg

200g flour

10ml baking powder

2ml salt

250ml milk

Preheat your oven to 190℃.

Line a 12-hole muffin tin with paper cups and give them a light spray with nonstick baking spray.

Add the butter and sugar to the bowl of a stand mixer fitted with the paddle attachment and mix on high speed until you have a light and creamy mixture.

Add the egg and mix until incorporated.

Sieve the flour, baking powder and salt into a separate mixing bowl. With the mixer running, add one or two spoonful of dry ingredients before adding a small amount of milk. Keep alternating until all the dry ingredients and milk is incorporated and mixed through.

Spoon the mixture into the prepared paper cups and bake for 25 minutes.

Remove from the oven

Marmite-butter:

150g butter

45ml Marmite

parmesan cheese

Start on the marmite-butter once you have the cupcakes baking in the oven.

Melt the butter and stir in the marmite.

Now mix vigorously until the mixture emulsifies: the butter and marmite should become one mixture.

Once you have removed the warm cupcakes from the oven, poke a few holes in them with a toothpick.

Spoon generous amounts of the butter mixture over each of the cupcakes so that all the savoury goodness gets soaked up.

Grate a generous amount of parmesan cheese onto each little cake before serving at room temperature.

Tomato Tartlettes

Tomato Tartlettes

These jewel like tomato tarts are sweet, fresh and the perfect accompaniment to most summer meals. I like to drizzle mine with a balsamic vinegar reduction when I’m about to serve them but of course that is entirely up to you.

For the pastry:

750ml cake flour

2,5ml salt

250g butter

250ml sour cream

Sift the flour and salt twice.

Cut the cold butter into small cubes, add to the flour and rub the butter into the flour mixture with your fingertips until it is the size of peas.

Add the sour cream to the mixture and mix to create a firm dough.

Knead the dough three or four times and roll and fold for three or four times. You want the butter to disperse evenly throughout the pastry without warming/overworking the pastry.

Wrap your bundle and refrigerate for thirty minutes or overnight.

Preparing the tomato:

Cut a cross on the bottom of the tomato.

Fill a saucepan with boiling water and turn on the heat.

As soon as the water simmers, drop the tomato into the hot water and leave for one minute.

Scoop out the tomato with a spoon and plunge it straight into a bowl with ice cold water.

Take the tomato out of the water and pull of the skins.

Set aside to dry.

Preheat your oven to 220℃.
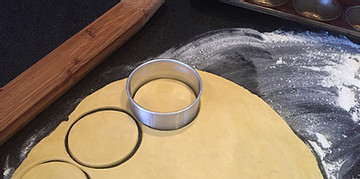
Spray or grease a twelve hole muffin tin.

Lightly dust your counter surface and roll the pastry to a thickness of about three millimetres.

Cut out rounds and line the tin.

Sprinkle half a teaspoon sugar into each pastry case and place the tomato on top, bottom facing up.

Drizzle with some olive oil and season with salt and pepper.

Bake in the preheated oven for about 35 minutes. Remove from the oven.

Let the tarts cool for ten minutes or so before removing from the baking tin.

Drizzle with a balsamic vinegar reduction and/or olive oil and serve.

Tiramisu “Cake”

Tiramisu “Cake”

I was old when I went to chef school …. stress made me twice my age when I left! I knew attending one of the top three schools in the world would require hard work, giving up my old, ingrained kitchen habits and practice, practice, practice until one gets it perfect BUT, I never bargained on the amount of self-imposed stress it would put on me! This was particularly evident when we made crepes. These delicate French pancakes had to be “thin enough to read a newspaper through!” My kitchen instincts told me that I wanted mine to be comforting … Chef insisted on thin; I made mine chewy … Chef insisted on delicate, and on and on..and the stress!!!

I love everything French but honestly I like my pancakes the South African way: chewy, rather on the thick than thin side and fluffy and substantial in a good way and in my own kitchen, that is exactly the way I make them!

For the pancakes:

This makes a batch of about 20 pancakes which is what you will need for an average sized cake that will feed eight people that really like tiramisu and pancakes.

500ml cake flour

2ml baking powder

5ml salt

500ml milk

250ml water

125ml oil

3 eggs

Add the cake flour, baking powder and salt to the mixing bowl of a stand mixer.

Add the milk, water, oil and eggs to another mixing bowl and give it a really good whisk by hand so that the eggs break up and the ingredients mix together.

Fit the whisk attachment to the mixer and set it on low speed. Add the liquid ingredients in a trickle until the mixture starts to resemble a thick batter.

Turn the speed up a notch and keep adding the liquids. Stop pouring the liquids if you notice lumps in the batter and turn your mixer onto a high speed. Whisk until you see no more lumps, go back to a slower speed and add the rest of the liquid ingredients in a steady stream.

Give the batter a good whisk on high speed for about one minute.

Cover and leave to rest for at least an hour so that the flour can fully absorb the liquid ingredients.

Once rested, bake your pancakes. You will need oil in a non-stick pan for the first and/or second pancake and thereafter the oil in the batter should be enough to make the baking process joyful and oil less!

Leave the pancakes to cool completely before assembling.

Tiramisu filling:

500g mascarpone

250ml whipping/thick cream

30ml espresso coffee powder

15ml caramel extract or vanilla extract

50ml caster sugar, or more if you like it sweeter (taste as you go along)

Fit a stand mixer with the whisk attachment and soften the mascarpone by running the mixer on a low speed for a few minutes and scraping the mixture down every now and then.

Add the other tiramisu ingredients and whisk at medium/high speed until you have a thick creamy consistency that holds its shape.

Assemble your tiramisu cake by layering a pancake and two heaped tablespoons of tiramisu mixture. Keep building the cake until either the pancakes or the cream mixture runs out. Finish it off by dusting with cocoa powder and chocolate shavings.

Baked Apple

Baked Apple

Bake these apples when you have a craving for syrupy, cinnamon filled pastries.

Apples

A handful of raisins and nuts

Cinnamon, mixed spice and brown sugar

Shortcrust pastry / store-bought pastry

One egg and a dash of milk, lightly beaten

Crumble:

10g cake flour

8g butter

5g sugar

Select the apples you want to bake. Wash and dry each thoroughly.

Cut off the tops and with a teaspoon, carefully take out the core and flesh so that you are left with a hollow apple.

Put the fleshy bits, some raisins and a splash of water into a small saucepan. Add some mixed spice, cinnamon and brown sugar and simmer to soften the fruit. Take off the heat and cool.

Spoon the fruit mixture into the apples

OR

you can cover the apples with the pastry before spooning in the fruit mixture.

Dust a work surface with some flour and roll out the pastry to 3mm thickness. Place the apple in the centre of the pastry and make spike-like cuts all around. Fold each cut piece of pastry over the outside of the apple. Keep going until the entire apple is covered with pastry.

Crumble:

Add the butter, flour and brown sugar to a small bowl and rub together until the mixture resembles grains of rice. It should be well mixed but clumpy. Top off the apples with the crumble.

Brush the pastry with the egg and milk mixture and bake at 200℃ for 15 – 20 minutes or until the pastry is golden and the baked apple aroma fills your kitchen.

No-knead Seed Bread

No-knead Seed Bread

Don’t be fooled by how easy it is to make this bread. It is one of the best breads you will ever make with the least effort and will probably become one of your fall-backs in times to come!

15ml dried yeast

250ml lukewarm water

400g wholemeal flour

10ml salt

125ml sunflower seeds

62ml sesame seeds

62ml linseeds

30ml oil

Lockdown tip: If you don’t have have the specified seeds you may replace it with other seeds or even nuts you do have at hand, as long as the total amount of seeds make up the equivalent of 250ml. You may even replace with pumpkin seeds which you have dried and toasted yourself!

Pour the lukewarm water into a suitable container and sprinkle the yeast on top. Give it a good stir and leave to stand until bubbles start appearing on the surface.

Mix the flour and salt in another mixing bowl.

Stir in the seeds.

Add the yeast mixture and oil to this bowl and mix through with a spatula.

Now check the consistency of your dough. You want it to slide off the spatula. If you have a dough that is too stiff, add a tiny amount of lukewarm water and mix again. Check whether the dough now slides off the spatula. Keep going until you have achieved the desired consistency.

Preheat your oven to 200℃.

Grease a medium sized bread tin and spoon the mixture into it. Cover lightly with plastic wrap and a tea towel and leave to stand at room temperature until almost doubled in size.

Bake the bread for one hour.

Take out of the oven, let it rest on a cooling rack for ten minutes and then take it out of the tin. Cool completely before slicing.