Hi and welcome to my blog! My name is Karen and I love cooking simple, uncomplicated, flavourful food. My cooking is inspired by seasonal ingredients, punchy flavours, an awareness of sustainability and of course by the likes and dislikes of my family and friends that sit around my table as well as you, the virtual guests around my table!
I am a chef, recipe developer and food stylist and generate my own content. I am also completely addicted to recipe books, of which I have an extremely large collection but the essence of my food is about celebrating life and all the fabulousness that we can add by creating good food.
Thank you for reading my blog. Please keep on giving me feedback and may your kitchen, as mine, be filled with joy and the best tasting food!
One of the very best dishes I have ever eaten is the Pumpkin Risotto and Arancini by Chef Liam Tomlin. I can have it for breakfast, lunch and dinner and have it again the next day. ( See my COOK & BOOK section for more about his latest book TAPAS, where you can find the recipe.)
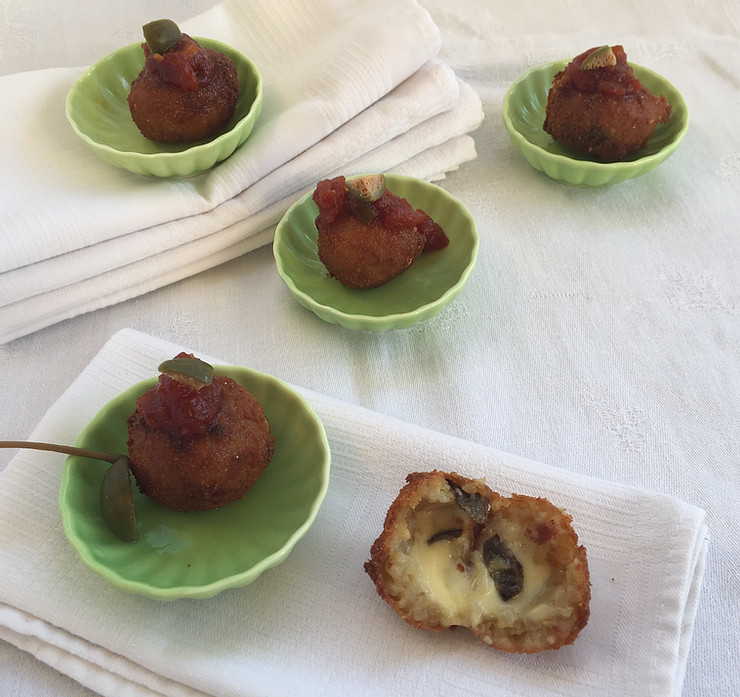
This recipe is for Arancini made with leftover mushroom risotto, but you may use any risotto to make these. It is a delicious and substantial canapé to have with that perfect glass of wine or alternatively, served with a salad as a starter.
cold, leftover mushroom risotto (recipe on this site)
±100g flour, seasoned with salt
2 eggs, lightly beaten
± 100g fine breadcrumbs
Mozzarella cheese, cut into 1cm X 1cm cubes
vegetable oil for deep-frying
Line a baking tray with baking paper.
Scoop about 15ml of the risotto into your hand (I use my measuring spoon for this) and push a cube of cheese into it. Manipulate the rice to cover the cheese completely and shape into a ball. Place the risotto ball on the lined baking sheet. Keep going until you have the quantity you want.
Line up 3 shallow containers.
Add the flour to the first container, the eggs to the second and the breadcrumbs to the third.
Now roll a risotto ball in the flour, dip it into the egg mixture and finally roll it in the breadcrumbs.
Make sure that each risotto ball is completely covered by each of the ingredients before proceeding to the next.
Place the coated balls back onto the lined tray.
Add enough vegetable oil to a heavy based saucepan to deep-fry the balls. The oil should be about 170℃.
Place a risotto ball onto a slotted spoon and lower it into the heated oil. Add about 4 -5 at a time, depending on the size of the saucepan, and fry until beautifully golden.
Lift out onto some kitchen paper to drain the excess oil.
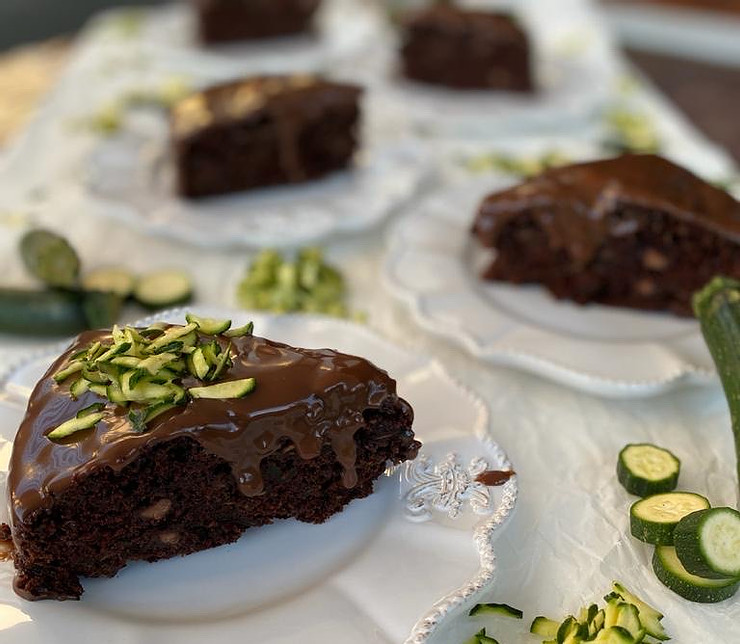
This is one of my all-time favourite cakes. It is not too sweet but wonderfully moist. It has the finest crumb but you get the texture of the zucchini. It is totally satisfying and extremely moorish. I really love eating this cake.
If you are a food snob, this recipe is NOT for you. I add local, ordinary milk chocolate to the cake and I make the ganache with local, ordinary milk chocolate. I believe it balances the tastes, but feel free to add a 70% cocoa chocolate if you wish.
240g flour
60g cocoa powder
15ml bicarbonate of soda
2,5ml baking powder
2,5ml salt
110g butter at room temperature
180g sugar
5ml vanilla extract
5ml coffee granules
3 eggs
350g zucchini, grated
150g milk chocolate, roughly chopped into chunky pieces
150g milk chocolate
300g cream
Preheat your oven to 180℃.
Grease a 23cm loose-bottomed cake tin.
Mix the flour, cocoa powder, bicarbonate of soda, baking powder and salt in a mixing bowl.
Add the butter and sugar to the bowl of a stand mixer fitted with the paddle attachment. Beat until light and fluffy, scraping down once or twice.
With the machine on low speed, add the vanilla, coffee granules and eggs. Beat well in between each addition.
Now, reserve about 120g of the flour mixture and set it aside.
Add the rest of the flour mixture to the egg mixture with the machine on low speed.
Add the grated zucchini and chopped chocolate to the reserved flour mixture and lightly mix it through. The aim is to cover the zucchini and chocolate with flour. Break up any lumps that may form by pushing lightly onto it with a spoon.
Fold the zucchini mixture into the cake batter.
Spoon the mixture into the prepared cake tin and level the batter with the back of a spoon.
Bake for 40 minutes or until a cake tester inserted into the centre comes out clean.
Transfer the cake to a cooling rack for 10 minutes before running a sharp knife around the edge of the cake. Remove the cake ring and allow the cake to cool completely
Milk chocolate ganache:
Chop the chocolate into small pieces and add it to a glass bowl.
Pour the cream onto the chocolate.
Fill a small saucepan onto which the glass bowl can fit with 5-6 cm of water. Turn on the heat and bring the water to a simmer.
Now put the glass bowl onto the saucepan. Make sure that the bottom of the bowl does not touch the water.
Allow the mixture to warm up, stirring occasionally until the chocolate has melted completely.
Remove from the heat and put the bowl onto a dry tea towel.
Beat the mixture by hand so that it can cool down. If you become tired, leave the ganache to stand and return 5 minutes later to beat again. You need a thick, smooth, cool mixture to pour onto the cake. All lumps can be removed by beating the ganache vigorously by hand.
Once the ganache is cool enough and the cake has cooled completely, you may pour the ganache onto the cake.
The picture is of a sirloin steak with Chimichurri sauce. Below I offer tips on cooking the perfect steak, served with your favourite sauce.
The quality of the meat you choose is very important. A steak that has been dry-aged for 30 days and is between 3 and 4 cm thick is perfect in every way.
Bring the steak to room temperature at least one hour before cooking it.
Generously salt the steak and rub the salt into the meat as this cures the surface of the meat, leaving you with a tender and flavoursome piece of meat. You may salt it 24 hours in advance but one hour before cooking is quite enough time.
Preheat your oven to 180℃.
Pat the steak dry and lightly salt it once more. You do not want to add pepper to your steak before cooking, it as the pepper will burn. Add pepper to an already cooked steak.
Put a heavy-based frying pan onto a high heat.
Add a knob or two of butter and rosemary/thyme/garlic, if you so wish.
Wait for the pan to heat up.
Add the steak to the pan and do not touch it for 2-3 minutes before turning it. Now hold the pan on a slight angle and baste the steak with the flavoured butter. Cook in this way for another 2-3 minutes to develop a golden colour and the most incredible aromas!
Stick the pan into the preheated oven for 4 minutes so that the steak heats through. It will not cook further if you allow 4 minutes!!
Remove the steak from the oven and remove it from the pan. Cover with tinfoil and a tea-towel. Rest for 10 minutes so that the meat can relax and absorb all the juices.
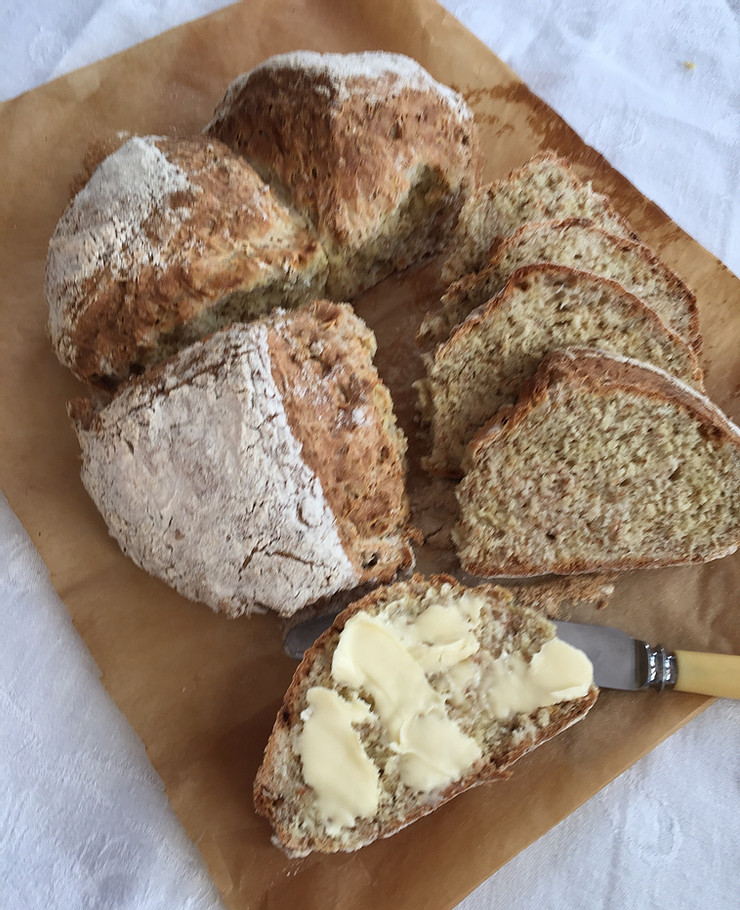
This is one of my all-time favourite quick-breads when I have no time, a steaming pot of soup and am in desperate need of good, fresh bread.
250g wholemeal flour
250g cake flour
5ml bicarbonate of soda
5ml salt
420ml buttermilk
Add the wholemeal and cake flour to a large mixing bowl.
Add the bicarb, salt and then mix in the buttermilk to form a sticky, stiff dough.
Tip the dough onto a work surface that has been floured. Now roll and fold the dough for two minutes or so, but do not knead it.
Shape it into a round and flatten slightly with the palm of your hand.
Line a baking sheet with baking paper and place your bread onto it. Dust the bread with cake flour.
Divide the bread into quarters by cutting across, turning and cutting once more. Once you’ve pushed the knife through, wiggle it slightly from side-to-side to separate slightly. When the dough rises and bakes it will join up again.
Let the bread rest on the work surface for 30 minutes.
Preheat your oven to 200℃.
Bake for 30 minutes.
The bread should sound hollow when tapped on the bottom.
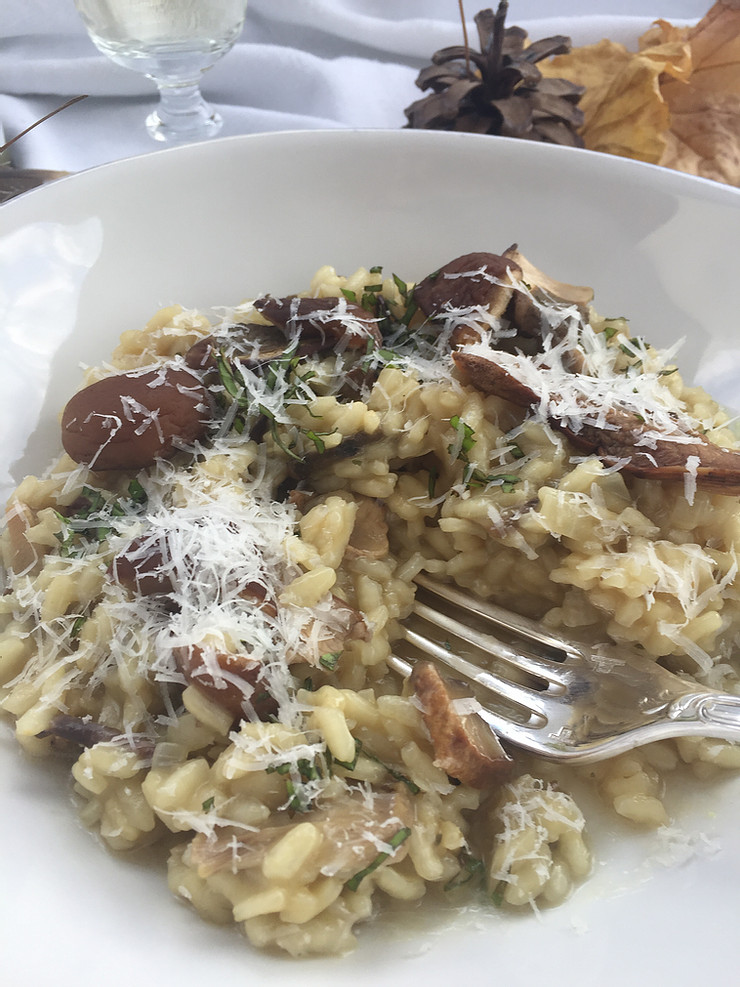
When I was at chef school, one of my favourite chefs and lecturers used to say that you cannot make risotto while you are angry at someone! If you’re making risotto the traditional way you have to stir, pour stock and stir some more for about 40 minutes. I am very inpatient but I love cooking risotto. There is something calming and soothing about tending to a pan of risotto and of course, if you’ve tasted a good risotto once, you have the sublime end-product to look forward to.
Because the risotto relies on the mushroom for its dominant flavour I would recommend sourcing dried Porcini mushrooms. They are fragrant and earthy and brings an other-worldly fabulousness to this dish. Try Delheim Wine Estate for Porcini mushrooms that have been foraged and dried on their estate and while you’re at it, get a few bottles of their Sauvignon Blanc as well! (See the COOK & BOOK section for more detail on Delheim).
±80g risotto rice per person (I use 100g per person so that I have enough risotto left over to make Arancini the next day)
100g butter and some good olive oil
100g dried Porcini mushrooms or mixed mushrooms
250ml white wine, the Delheim Sauvignon Blanc is utterly delicious!
1 onion, very finely chopped
5 cloves of garlic, minced
2 litres of stock
salt
parmesan or pecorino cheese
Soak the dried mushrooms by placing them in a bowl and adding warm tap water to it. Allow to stand and soak for at least 1 hour.
Put a sieve over a stock pot and drain the mushrooms into the pot so that you have the mushrooms in the sieve and the soaking liquid in the pot. Put the mushrooms to the side and add the 2 litres stock to the mushroom liquid. Turn on the heat to warm the stock. Once warm you may turn the heat to low, so that the stock keeps warm.
Now, pour yourself a glass of the Sauvignon and put a heavy-based, deep pan onto medium to high heat. Add the butter to the pan and allow to melt.
Add more or less the same amount of olive oil to the melted butter and stir in the onion.
Add the garlic and stir the mixture for 1 minute before adding the risotto rice.
Stir the rice around so that every granule gets coated with the butter and oil mixture and the grains start to appear almost translucent.
Add the white wine and allow it to bubble for about 2 minutes.
Now add about two ladles full of stock to the rice and stir around slowly, waiting for the rice to absorb the liquid. Add another two ladles full of stock and stir again. Keep adding and stirring until the rice isn’t absorbing any more stock.
The risotto should now be creamy and not dry and the rice must retain its “bite”/be al dente.
Add the soaked mushrooms that you have kept to the side and allow it some time to integrate and release its flavour into the dish.
Season the risotto with salt and by grating a generous amount of parmesan into it and taste whether it is to your liking.
Serve with extra parmesan, a crusty loaf of bread and a good wine.
What do Portofino, Venice and Rome have in common, apart from all being in Italy? The most exquisite, all-ricotta cheesecake!
This recipe relies on ricotta only and doesn’t have a crust. It is light, fresh and authentic Italian. I like to serve it with an orange syrup but it is delicious served as is…..simplicity in all its glory!
100ml almond meal
15ml soft butter
800g fresh ricotta, well drained (See my Ricotta recipe to make your own)
6 eggs, separated
62ml cake flour
125ml + 125ml sugar
1,2ml salt
grated rind of one orange
Preheat your oven to 180℃.
Grease a 23cm loose-bottomed cake tin with the butter, making sure you coat the base and sides.
Now sprinkle the almond meal onto the base and then tilt the tin so that the almond meal sticks to the sides as well. You want a thorough coating of the base and sides. Shake out and discard any extra almond meal.
Add the ricotta to the bowl of a stand mixer fitted with the paddle attachment and beat until light.
Add the egg yolks, flour, 125ml sugar, salt and orange rind and mix until the ingredients are well combined.
Add the egg whites to a large mixing bowl and whisk until soft peak stage.
Add one spoonful of sugar and whisk the mixture for at least 30 seconds before adding the next spoonful. Keep adding and beating until you have a stiff, glossy mixture into which all of the sugar has been incorporated.
Fold a third of this meringue mixture into the ricotta mixture.
Now add the rest and gently fold it in until the two mixtures are well blended.
Spoon the batter into the prepared cake tin and bake it in the oven for one hour. The cake is done when it is an even golden colour with the centre still being slightly wobbly.
Once out of the oven, cool the cake in the baking tin for 30 minutes before running a sharp knife around the edge of the cake. Carefully remove the ring of the tin and allow the cake to cool completely.
This recipe deviates slightly from the traditional German Eisbein which has a crispy, fatty outside. I like to finish mine off by leaving on the skin and glazing it with honey and mustard. This dish is a winter winner, served with creamy mashed potatoes and a fresh coleslaw salad to cut through the richness of the pork.
ham hocks (I prepare one for two people to share, but it’s your choice)
1 onion, halved
2 carrots, roughly chopped
5 black peppercorns
2 bay leaves
Put the pork into a vessel that is large enough for you to cover all the meat with water.
Add the onion, carrots, pepper and bay leaves the pork and fill your cooking vessel with water.
Turn up the heat and allow it to come to a gentle simmer.
Let it simmer away for two to three hours.
Take the hocks out of the liquid and let it stand to dry.
In the meantime, preheat your oven to 220℃.
For the glaze:
50ml honey
50ml Dijon mustard
50ml melted butter
Add the ingredients to a small mixing bowl or cup and whisk to blend together.
Place the hocks into a roasting dish and brush the glaze all over it.
Roast in the oven, glazing once or twice more, until beautifully browned and crispy.
Serve with mashed potato and a fresh coleslaw salad.
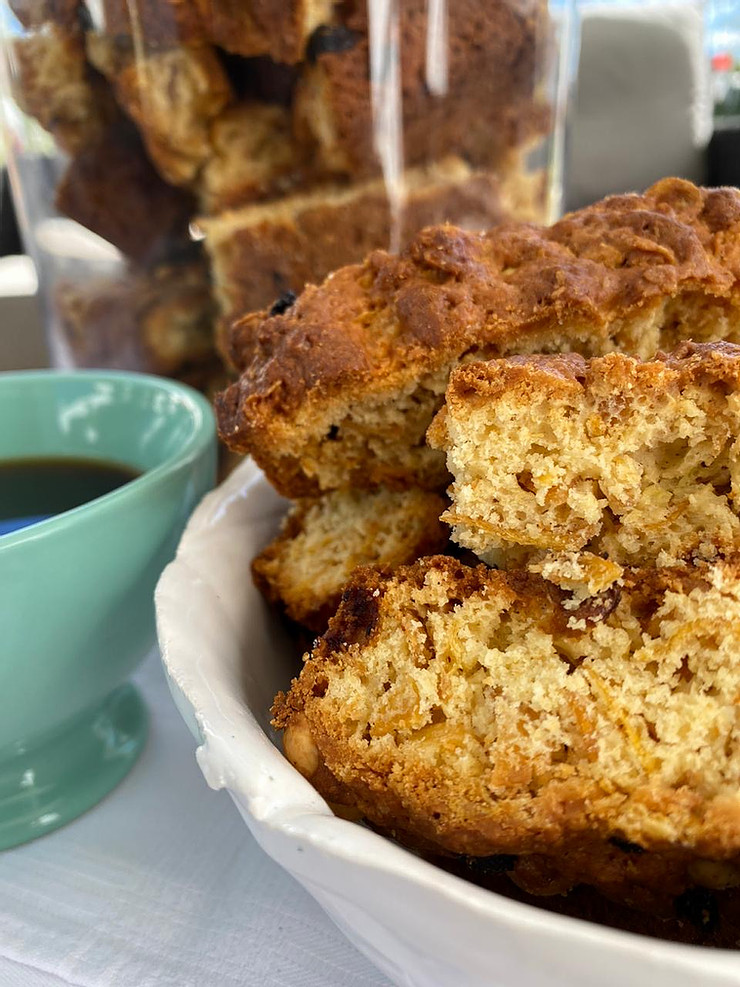
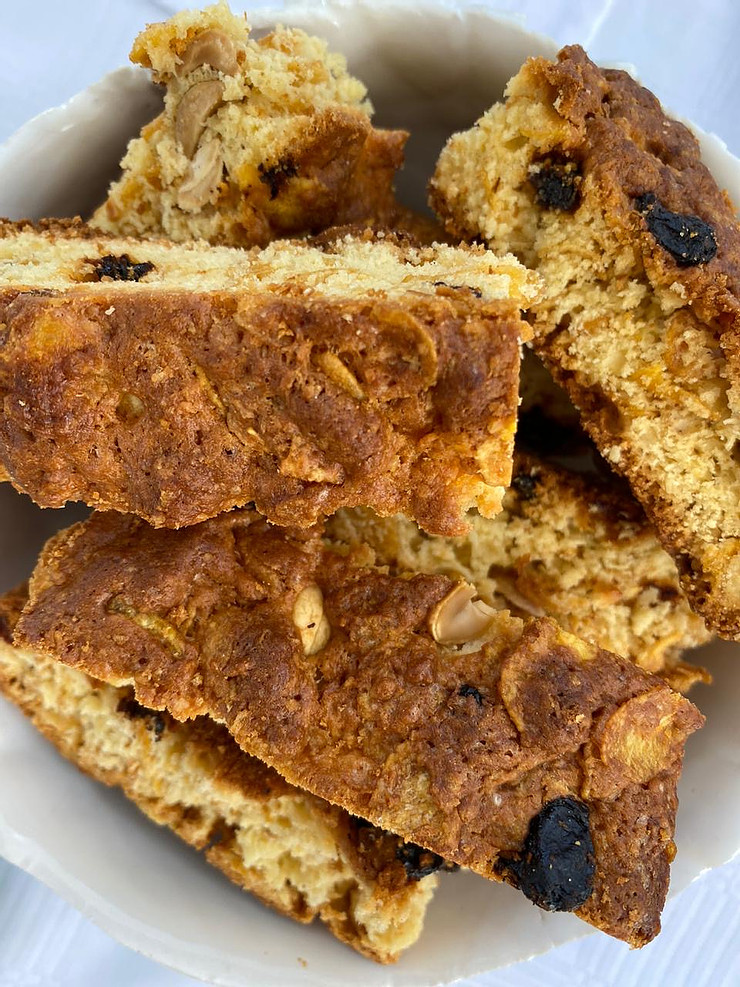
This recipe was given to me by my friend Marinda Schouwstra. She is one of the gutsiest, honest and intelligent people I know but famously claims not to be able to cook even an egg! (Her children have confirmed this with various, hilarious stories over the years! Thanks for those Ciska-Marie!!)
These rusks are healthy, delicious and as easy as one, two, three. Simply mix up all the ingredients and bake….really!!
900g self raising flour
315ml brown sugar
300g All Bran flakes or any other bran cereal
190ml raisins
190ml peanuts
250ml coconut
5ml salt
10ml baking powder
4 large eggs, if you think they might be medium add another one
500ml buttermilk
500ml butter, melted
Preheat your oven to 180℃.
Grease a roasting tin of about 37cm X 27cm.
Mix the flour, sugar, cereal, raisins, peanuts, coconut, salt and baking powder in a large mixing bowl. Set aside.
Add the eggs to another mixing bowl and give them a whisk to break them up.
Add the buttermilk and the melted butter to the eggs and whisk together.
Add the wet mixture to the dry mixture and mix through. At this stage it will look as though you might not have enough moisture but keep turning the ingredients until all the dry spots of flour are covered.
Spoon the rusk mixture into the prepared tin and press it down with the palm of your hand. This is important as the final rusk will be very brittle if not compressed at this stage.
Put the roasting tin into the oven and bake for one hour.
Remove the rusk mixture and allow it to cool completely in the tin.
Gently cut into finger sized portions with a serated knife and pack the rusks 1cm apart on a flat baking sheet.
Dry in an oven set at 50℃ for about 3 hours, leaving the oven door slightly ajar.
Let the rusks cool before storing in a glass container.