Green-Pea Flan with Zucchini Pickle

Green-Pea Flan with Zucchini Pickle

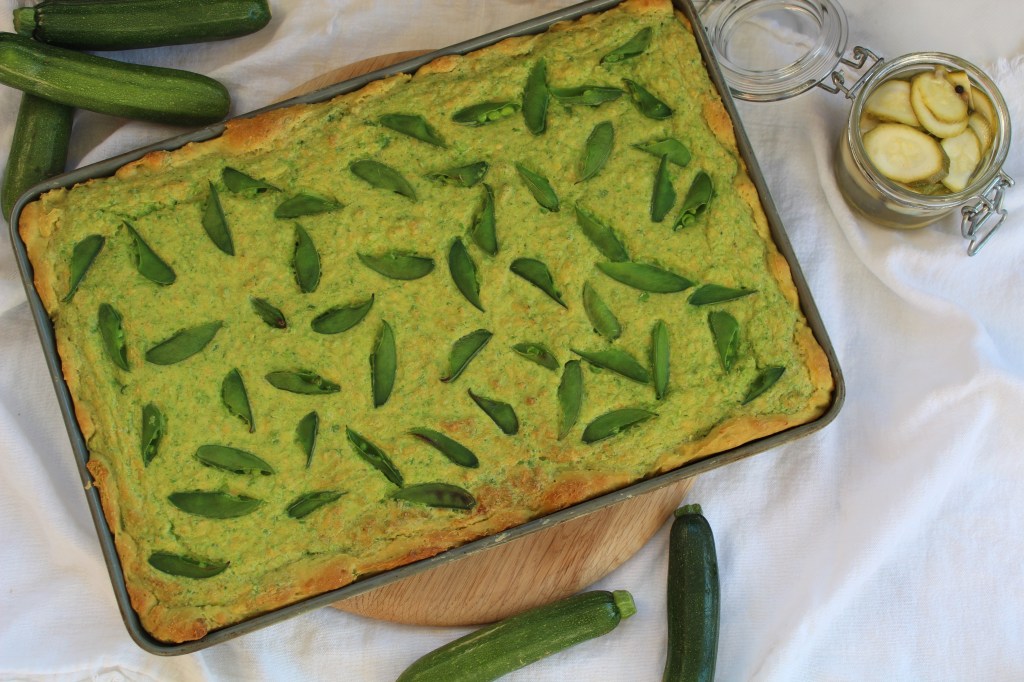
This is a delicious and healthy meal based on Jamie Oliver’s avocado pastry recipe. The quick pickle elevates this plant-based dish from good to absolutely fabulous!

2 medium avocado pears
400g self-raising flour
ice water
6 eggs
5ml salt
400g frozen peas, defrosted
140g cheddar cheese, grated
200g sugarsnaps, halved

Quick Pickle:
500ml vinegar
500ml water
83ml sugar
30ml salt
10ml mustard seeds
10ml whole black peppercorns
4 cloves of garlic, cracked
2 bay leaves
12 zucchini

Start by making the pickle:
Slice the zucchini into coins/strips and place it in a glass bowl.
Add the rest of the ingredients for the pickle to a saucepan. Place over high heat until tiny bubbles appear at the edges.
Remove the saucepan from the heat and pour the pickle onto the prepared zucchini.
Set aside until cold. (The pickle may be bottled at this stage and stored in the refrigerator).

Preheat your oven to 180℃ and spray a 38cm X 25cm oven tray with cooking spray.
Scoop the flesh from the avocados into a food processor and add the flour.
Pulse at high speed until the mixture resembles coarse, wet sand.
Add a very small amount of ice cold water to the mixture while the engine is running. The mixture should come together into a ball.
Line the prepared baking tray with the avocado-pastry by pushing it about 2cm up the sides of the tray as well as covering the bottom as evenly as you can. The pastry is too wet to roll – be patient in pushing/spreading it out as evenly as you can. Set aside.
Add the eggs, salt, defrosted peas and cheddar cheese to the bowl of your food processor and blitz on high speed.
Pour this mixture onto the avocado-pastry and scatter the fresh sugarsnaps on top.
Bake the flan for 30 minutes.
Remove from the oven and immediately cut into portions.
Serve a portion of the flan with a generous amount of zucchini pickles on top.

Chocolate Bread-and-Butter Pudding

Chocolate Bread-and-Butter Pudding

This is the perfect make-ahead dessert when entertaining as it needs to rest in the refrigerator for 24 hours before baking. With its crunchy outside top and soft, squidgy inside it is best served in small portions as it is very rich. Leftovers are equally good when cold!

10 slices white bread, 0,5cm thick
160g dark chocolate, chopped
75g butter
450ml cream
60ml dark rum
110g caster sugar
a pinch of cinnamon
3 eggs
extra pouring cream for serving

Grease a 18cm X 28cm ovenproof ceramic dish.
Remove the crusts from the bread slices and then cut each slice into 4 triangles. Set aside.
Add the chocolate, butter, cream, rum, sugar and cinnamon to a heatproof bowl set over a saucepan of barely simmering water.
Stir the mixture every now-and-then until the butter and chocolate has melted and the sugar has dissolved.
Remove the bowl from the heat and give it a good stir to amalgamate the ingredients. Put aside.
Add the eggs to a large mixing bowl and whisk together.
Pour the chocolate mixture over the eggs in a thin stream while whisking continuously. Remember: pour slowly, whisk quickly.
Spoon a 1cm layer of chocolate mixture into the base of the baking dish and arrange half the bread triangles in overlapping rows on this chocolate layer.

Pour half of the remaining chocolate mixture as evenly as you can, over the bread.
Arrange the rest of the triangles on top of this layer, finishing off with a layer of chocolate.

Gently press down the bread with a spoon so that it gets covered evenly with the liquid as it cools.
Cover the dish with plastic wrap and allow to cool completely. Place the dish in the refrigerator for 24 hours.

Cooking the pudding:
Preheat your oven to 180℃.
Remove the plastic wrap and bake the pudding for 35 minutes.
Allow to stand for 10 minutes before serving with pouring cream, custard or ice cream.


Chocolate-Brownie Cheesecake

Chocolate-Brownie Cheesecake

The best of two worlds!! A delicious chocolatey brownie base with a velvet baked cheesecake topping!

For the brownie base:
115g butter
115g dark chocolate, chopped
200g caster sugar
2 eggs
50ml milk
115g flour

For the cheesecake topping:
500g cream cheese, room temperature
125g caster sugar
3 eggs
5ml vanilla
125ml Greek yoghurt

Preheat your oven to 180℃ and grease a 22cm loose-bottom cake tin.
Add the butter and chopped chocolate to a heatproof mixing bowl and place it over a saucepan of barely simmering water. Stir every now and then until melted.
Remove the bowl from the head and add the sugar. Whisk until the ingredients are amalgamated.
Add the eggs and milk and whisk to mix.
Add the flour and stir through until the mixture is just blended.
Scrape the mixture into the prepared cake tin and even it out with a spatula.
Place in the oven and bake for 25 minutes.
Remove and set aside.
Lower the oven temperature to 160℃.
Add the cream cheese, sugar, eggs and vanilla to the bowl of a stand mixer fitted with the paddle attachment.
Beat together on high speed until you have a smooth mixture. Scrape the bowl down once or twice in between mixing.
Remove the bowl from the mixer and add the yoghurt. Stir the yoghurt through the cheesecake mixture.
Pour the mixture onto the baked brownie base.
Place in the oven and bake for 55 minutes.

Remove the cake from the oven and place it on a cooling rack to cool completely.
Cover with plastic wrap and refrigerate for a minimum of 4 hours, but preferably overnight.
Run a knife around the edge of the cake before removing the sides of the cake tin.
Cut into slices and drizzle with melted chocolate to serve.

Spanish Sweet Milk Bread

Spanish Sweet Milk Bread

Also known as Pan de Leche these large, sweet rolls are eaten all over Spain at breakfast. This recipe yields 4 large buns.

100ml milk, lukewarm
10ml instant yeast
50g butter, softened
70g granulated sugar
1 egg
200g bread flour

Warm the milk and pour it into a mixing bowl.
Add the yeast and stir until dissolved.
Cover the bowl with a tea towel and set aside in a warm place for 10 minutes.
Add the butter and sugar to the bowl of a stand mixer fitted with the paddle attachment. Set the machine on medium-high speed and cream the ingredients together.
Add the egg and beat to incorporate into the mixture.
Add the yeast and milk mixture and mix again.
Remove the bowl from the mixer and add half a cup of flour at a time, stirring the flour into the mixture with a wooden spoon. Keep going until all of the flour has been incorporated.
Dust the dough with 15ml of flour and cover with plastic wrap. Set aside and allow to proof for 30 minutes.

Preheat your oven to 200℃ and line a baking sheet with baking paper.
Lightly coat your hands with vegetable oil and knead the dough 5 or 6 times. The dough will be very sticky!
Divide the dough into 4 equal pieces.
Shape each piece into an oval shape and place it on the prepared baking sheet.
Allow to rise for 15 minutes.
Bake the rolls for 8 minutes.
Remove the baking sheet from the oven and lightly brush the rolls with vegetable oil. You may sprinkle the rolls with brown sugar at this stage.
Return the rolls to the oven and bake for a further 10 minutes.
Remove from the oven and cool for 5 minutes before serving.

Broccoli Pasta

Broccoli Pasta

This recipe is easy, quick and really big on flavour. The recipe will feed 8 hungry adults.

500g dried pasta
1 onion, chopped
2 cloves of garlic, minced
a handful of parsley
a handful of basil
2 heads of broccoli ( I know it sounds like you are about to feed an army!!!)
5ml salt
2,5ml black pepper
1 stock cube
250g cream cheese
30ml lemon juice

Cook the pasta according to the instructions on the packet.
Cut the broccoli florets from the stems and add them to the pasta during the last 2 minutes of cooking time.
Reserve 250ml of the pasta water before draining the pasta and the broccoli florets. Keep aside.
Chop the broccoli stems and add them to a large saucepan with a good dash of vegetable oil.
Turn the heat on to medium and add the onion and garlic. Cook until the onions are soft.
Add the 250ml pasta water and the stock cube and cook until the broccoli stems are soft.
Take the saucepan off the heat and pour the mixture into a liquidiser.
Add the parsley and basil and blitz. You are aiming to have a chunky, very thick sauce.
Pour this sauce back into the saucepan, add the salt and pepper and then stir the cream cheese into the mixture. Keep stirring until the cheese has melted and is incorporated into the rest of the sauce.
Add the lemon juice and stir through.
Now add the pasta and the broccoli florets. Stir the mixture so that everything is coated in the sauce.
Serve immediately.

Chocolate Pancakes

Chocolate Pancakes

These pancakes are not cocoa-chocolatey-looking but actually contain real chocolate in the batter!! Whether you serve them with ice-cream, fresh fruit and Chantilly cream or plain, from-the-pan, you will love them! Yields about 12 pancakes depending on the size of your pan.

80g dark chocolate, 70% cocoa
250ml + 100ml milk
90ml caster sugar
200g cake flour
100ml water
3 eggs
2,5ml vanilla
butter for frying

Chop the chocolate into small pieces and add it to a small saucepan.
Pour in 100ml milk and place on a very low heat.
Stir the mixture until the chocolate has melted completely and remove from the heat.
Add the 250ml milk and caster sugar and stir to dissolve the sugar. Set aside.
Sift the flour into a mixing bowl.
Pour the water, eggs and vanilla into a jug and whisk it together.
Pour the egg mixture into the flour in a very thin stream while whisking. Pour slowly, whisk quickly …. you don’t want lumps in your batter!
Now whisk in the chocolate mixture in the same way.
Cover the batter with a tea towel and allow to stand for one hour.

Heat a frying/crêpe pan until it is very hot.
Add a knob of butter and swirl it around so that it covers the surface of the pan.
Pour in a ladleful of batter and swirl again to evenly distribute in the pan.
Turn the heat down slightly and cook the pancake for 1 minute.
Turn the pancake over with a spatula and cook for another 30 seconds. (The combination of sugar and chocolate burns really easy!!)
Keep going with the rest of the batter until you have a heavily stack of chocolate pancakes.
Serve warm.

Chocolate Pots

Chocolate Pots

This traditional dessert, also known as Pots de Crème, is super easy to make. It is a rich and creamy no-bake dessert and most of all, it is deliciously smooth and not airy like a mousse. I serve this dessert in espresso cups as I find a larger serving too rich and overwhelming. This recipe yields 10 espresso-cup servings or 6 individual servings in standard ramekins.

250ml cream
100ml milk
160g dark chocolate, minimum 70% cocoa, chopped
40g brown sugar
3 egg yolks
5ml vanilla

Pour the cream and milk into a saucepan and slowly bring it to a simmer.
Take the saucepan from the heat the moment it starts to simmer.
Add the chopped chocolate and stir the mixture until the chocolate has melted completely.
Add the sugar, egg yolks and vanilla to a mixing bowl and whisk with electric beaters until pale and fluffy.
Drizzle the chocolate mixture onto the egg mixture, whisking continuously. Remember: pour slowly, whisk quickly! Keep going until you have added all of the chocolate mixture.
Divide the mixture between ramekins/espresso cups and allow to cool completely.
Place the cups on a baking sheet and cover with plastic wrap. Refrigerate for at least an hour or until you are ready to serve.
I serve my chocolate pots as they are but this dessert is often served with Chantilly cream.

Potato-Ricotta Bake

Potato-Ricotta Bake

This potato dish is a quick weekday dinner for vegetarians or a substantial side dish to any meat. If you don’t have ricotta cheese on hand, get the recipe from this site and make your own. Yields 6 – 8 portions.

6 large potatoes
350g ricotta cheese
4 eggs, lightly beaten
1 onion, finely chopped
a handful of chives, chopped
2 cloves of garlic, minced
40g parmesan/pecorino cheese, grated

Preheat your oven to 180℃ and grease a 20cm X 28cm baking dish.

Peel the potatoes and boil them until just cooked.
Slice them into 1,5cm cubes and put aside.
Add the eggs to a mixing bowl and whisk together.
Add the chopped onion, chives, minced garlic and parmesan to the egg mixture and whisk together.
Now add the cubed potato and mix through.
Spoon the mixture into the prepared baking dish and bake for 25 minutes until golden.
Serve with a green salad.


Chocolate and Pear Tart

Chocolate and Pear Tart

Chocolate and pear is a match made in heaven and with this delicious chocolate pastry as a base, few desserts will be able to compare to this tart!

Poached pears:
3 ripe pears
750ml water
250ml sugar
15ml lemon juice

Chocolate pastry:
80g dark chocolate, at least 70% cocoa
175g butter, cubed
230g caster sugar
4 egg yolks
10ml vanilla
15ml milk
50g cocoa powder
350g cake flour

Chocolate frangipane:
120g dark chocolate, at least 70% cocoa
120g butter, cubed
120g caster sugar
5ml vanilla
2 eggs
125g ground almonds
25g flour

Poaching the pears:
Pour the water into a small saucepan and add the sugar and lemon juice.
Turn the heat on to medium and stir until the sugar has dissolved.
Peel, halve and core the pears and add to the poaching liquid.
Cut a square of baking paper that is large enough to cover the saucepan. Scrunch the paper up and then slide it down into the saucepan until it touches the poaching liquid.
Bring the poaching liquid to the boil, reduce the heat and simmer gently until a wooden skewer can easily be inserted into the pear quarters.
Turn off the heat and allow the fruit to cool in the poaching liquid.
Remove the pear once it has cooled and keep aside.
Simmer the poaching liquid until it reduces to a syrup. Reserve this to glaze the tart with once it comes from the oven.

For the chocolate pastry:
Chop and melt the chocolate in a heatproof bowl set over a saucepan of simmering water, making sure that the bottom of the bowl is not in contact with the water.
Stir until silky smooth and completely melted.
Take the bowl from the heat and allow to cool slightly.
Add the cubed butter, sugar, egg yolks, vanilla and milk to the bowl of a food processor and blitz together.
Pour in the slightly cooled chocolate and pulse to blend in.
Sift the cocoa powder and flour into the chocolate mixture and blitz until the mixture comes together in a smooth ball of pastry.
Wrap the pastry with plastic wrap and store in the refrigerator for one hour.

Lightly spray a tart tin with baking spray.
Roll the pastry to a thickness of 3mm and line the baking tin on the bottom and sides.
Place the pastry case into the freezer for 1 hour.

Preheat your oven to 180℃.
Line the pastry case with baking paper and baking beans and bake for 15 minutes.
Set aside to cool.

For the chocolate frangipane:
Keep your oven on 180℃.
Melt the chocolate in a heatproof bowl set over a saucepan of simmering water, making sure that the bottom of the bowl is not in contact with the water. Stir until completely melted. Remove from the heat and set aside to cool slightly.
Add the butter and sugar to the bowl of a stand mixer fitted with the paddle attachment.
Cream the butter and sugar until light and fluffy.
Add the vanilla and the eggs and beat together, scraping down once or twice, until well blended.
Add the almonds and flour and fold into the egg mixture with a spatula.
Pour in the melted chocolate and stir once again to incorporate, with the spatula.
Spread the frangipane mixture onto the baked pastry case.
Slice the pears and position each sliced half onto the chocolate frangipane, spacing it so that there is enough space for all of the pear.
Bake the tart for 45 minutes.
Remove from the oven and brush the reduced poaching liquid (syrup) onto the warm tart.
Allow to cool in the baking mould.
Serve with a sprinkling of icing sugar or a scoop of vanilla ice cream.

Pistachio Butter

Pistachio Butter

Pistachio nut butter is relatively low in calories and fat but high in protein. Spread it on toast, stir it into oatmeal porridge or mix it into a cookie batter. You will need a powerful food processor to process the nuts.

Choose the amount of nuts – I used 500ml
Blanch the pistachios for two minutes, drain and spread them onto a tea towel.
Rub the between the cloth to remove the skins. The more skin you remove, the greener the pistachio butter!

Now roast the nuts at 170℃ for 7 minutes.
Add the pistachio to a food processor and blitz until creamy.
Scoop the nut butter into a glass jar and store in the fridge.