Chocolate and Vanilla Marble Cake

Chocolate and Vanilla Marble Cake

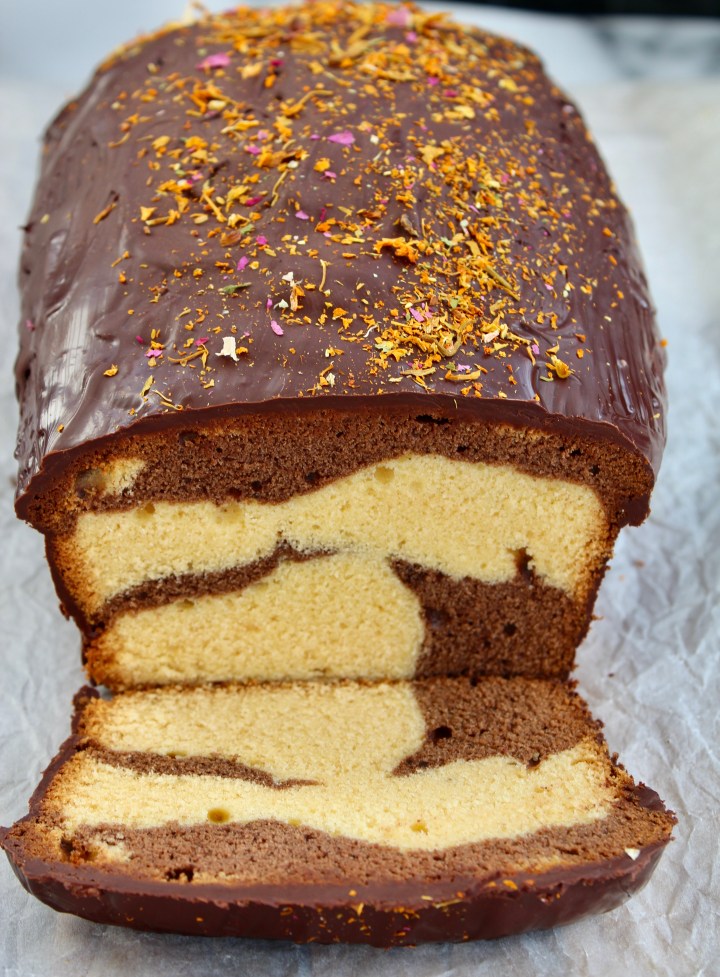
This cake has a fine, delicate crumb which gives it a silky mouth-feel and makes it the ultimate teatime treat!

220g butter, very soft
240g caster sugar
a pinch of salt
20ml honey
6 eggs
280g flour
2,5ml baking powder
30ml cocoa powder
5ml vanilla

Chocolate Glaze:
150g chocolate, 70% cocoa
10ml coconut oil
30ml vegetable oil

Preheat your oven to 170℃ and line a small loaf tin of 21cm X 11cm with baking paper.
Add the butter, sugar, salt and honey to the bowl of a stand mixer fitted with the paddle attachment.
Turn the mixer on to high speed and beat the mixture until it is fluffy and very pale – about 6 – 7 minutes, scraping down once or twice.
Add the eggs to a small bowl and whisk together.
Run the mixer’s engine on medium-low and add the egg a little at a time, waiting for it to be incorporated before adding more.
Now mix the flour and baking powder together and add it in the same way.
Scoop half of the batter into a clean mixing bowl and sift the cocoa powder over it. Mix with a spatula until the cocoa powder is fully incorporated – the batter will appear very dry, but keep mixing until it turns brown.
Add the vanilla to the half of the batter which you have kept in the mixer bowl and stir through.
Spoon 3-4 dollops of the vanilla batter into the baking tin, alternating with the cocoa batter. Keep going until there is no batter left.
Lightly pull a butter knife through the batter, stirring-mixing the two colours.
Level the top and bake the loaf for 1 hour and 15 minutes.
Cool the cake on a cooling rack for 10 minutes before removing it from the baking tin by lifting it out in the baking paper.
Allow the cake to cool completely.

For the chocolate glaze:
Add all the ingredients to a heatproof bowl set over simmering water and stir until melted completely.
Remove the glaze from the heat and allow to cool for about 15 minutes.
Place the cooled cake on a cooling rack and place the cooling rack inside a baking sheet so that the chocolate drips down into it.
Pour the glaze over the cake. Allow to stand at room temperature for at least one hour.
Slice and serve.


Baked Camembert with Blood Orange Sauce

Baked Camembert with Blood Orange Sauce

Baked cheese is such a versatile dish to serve; aperitifs, as a casual starter, an in-between-meals-snack and even as a cheese course after dinner. You may of course replace the Camembert with Brie or any other soft cheese with a runny centre and the blood orange with regular fresh oranges.


1 600g Camembert wheel (or 2-3 smaller ones)
1 roll store-bought puff pastry
egg wash: 1 egg and 15ml milk, whisked together

Blood Orange Sauce:
15ml honey
30ml red wine vinegar
180ml blood orange juice
15ml cold butter
2 oranges, segmented
a pinch of salt

For the baked cheese:
Preheat your oven to 190℃ and line a baking tray with baking paper.
Lightly dust a surface with flour and roll the pastry to a 3mm thickness.
Place the cheese wheel on the pastry and cut a circle 2cm wider than the cheese.

Now cut another pastry circle of the same size and drape it over the top of the cheese.
Lift the edges of the pastry at the bottom over the edges hanging down. Secure by pressing together with the tines of a fork.

Score the top of the pastry parcel with the back/blunt side of a sharp knife and brush the entire cheese parcel with the egg wash.
Bake for 25 minutes, remove from the oven and allow to stand for about 20 minutes.

For the sauce:
Pour the honey, vinegar and juice into a small saucepan and bring to a boil.
Reduce the mixture until syrupy.
Take off the heat, add the butter and whisk until amalgamated and you have a beautifully shiny sauce.
Add the orange segments to the sauce and spoon over the baked cheese.

Bacon and Cheese Crayfish Tails

Bacon and Cheese Crayfish Tails

This dish can be prepared in advance and grilled once your guests are seated. Delicious served with a grain salad or a crusty bread.

5-6 crayfish tails per person (it is the main dish after all!)
150g bacon, diced
30ml butter
1 onion, finely chopped
6 cloves garlic, minced
250ml cream
125ml parmesan cheese, grated
250ml Boerenkaas or mature cheddar, grated

Fully thaw the crayfish tails.
Turn your oven on to the grill setting and spray an ovenproof dish with cooking spray.
Fill a large stock pot/saucepan with salted water and bring to a rapid boil.
Add the crayfish tails, bring the water back up to a boil and cook the tails for 6 minutes.
Fill a large bowl with cold water and ice.
Take the tails from the boiling water and immediately immerse it in the ice water to stop the cooking process.
Lay a tail flat in your hand and cut the top shell with poultry shears down the centre of the back, to the tail.
Remove the vein and any shell shards.
Run your finger between the meat and the shell to loosen it. Lift and pull the meat from the shell and add it to the prepared ovenproof dish. Set aside.
Add the butter and bacon to a frying pan on medium-high heat and fry the bacon until crispy.
Scoop out the bacon bits and keep aside.
Turn the heat to medium and add the onion and garlic. Cook for 2 minutes while stirring.
Add the cream, parmesan cheese and cooked bacon and cook for another minute.
Take the sauce from the heat and evenly pour it over the crayfish tails.
Sprinkle the grated Boerenkaas over and place under the grill until the cheese has melted and is slightly charred.
Serve with fresh lemon wedges and a good glass of wine.

Blueberry Crumpets

Blueberry Crumpets

Call them crumpets, flapjacks or pancakes but they are all divine with this fresh blueberry sauce!

For the crumpets:
2 eggs
300ml milk
200g self-raising flour
1,2ml baking powder
a pinch of salt
100g butter, melted and cooled
150g blueberries

For the blueberry sauce:
300g blueberries
the juice of 1 orange
62ml sugar
30ml water

Making the crumpets:
Add the eggs and milk to a mixing bowl and whisk together by hand.
Sift the flour, baking powder and salt into the bowl and whisk thoroughly to combine.
Pour the cooled butter into the mixture and add the blueberries.
Gently stir the mixture through so that the blueberries don’t break up as this dilute your batter.
Place a frying pan on medium-high heat and add a small amount of vegetable oil.
Spoon about two large tablespoonfuls of batter per crumpet into the pan. Cook for about 2 minutes until set and starting to bubble around the edges. Flip the crumpet and cook for another 2 minutes or until golden.
Remove from the pan and keep warm.
Keep going until you have used all the batter.

Making the blueberry sauce:
Add the blueberries to a small saucepan and pour in the orange juice, sugar and water.
Bring the mixture to a boil while stirring to dissolve the sugar and cook for about 3 minutes, until the berries release their juice and the liquid becomes syrupy.
Cool the sauce to room temperature.

Serve the warm crumpets with the blueberry sauce and a dollop of yoghurt.

Chocolate-Orange Biscuits

Chocolate-Orange Biscuits

These biscuits do not look like much but they are soooo good! They have a wonderful snap and the chopped chocolate adds a sharp and delicious chocolatey fabulousness!!

125g butter
175g caster sugar
225g flour
10ml baking powder
80g dark chocolate, finely chopped BUT NOT SHAVED
the grated zest of 2 oranges
15ml fresh orange juice

Preheat your oven to 180℃ and line two baking sheets with baking paper.
Add the butter and sugar to the bowl of a stand mixer fitted with the paddle attachment and beat together on high speed. The mixture should be fluffy and airy.
Remove the bowl from the mixer and sift the flour and baking powder into the bowl. Stir together.
Add the chopped chocolate, orange zest and orange juice to the mixture and mix together with a spatula.
Flour a work surface and roll the dough to a 0,5cm thickness.
Cut out with a biscuit cutter of your choice and place on the prepared baking sheets.
Bake the biscuits for 20 minutes.
Remove the baking sheets from the oven and leave the biscuits on the sheets for 5 minutes before cooling it completely on a cooling rack.
Store the biscuits in an airtight glass jar.

Cranberry-Pistachio Biscotti

Cranberry-Pistachio Biscotti

I love to bake snacks that can be kept in a glass jar for a few weeks (very optimistic!) and biscotti has a place of honour amongst them. The recipe yields about 36 slices and can be kept for 3-4 weeks when stored in a sealed glass container.

62ml vegetable oil
190ml sugar
10ml vanilla
2 eggs
440ml flour
1,2ml salt
5ml baking powder
125ml dried cranberries
190ml pistachio nuts

Preheat your oven to 160℃ and line two large baking sheets with baking paper.
Add the oil and sugar to the bowl of a stand mixer fitted with the paddle attachment and beat on high speed until well blended.
Add the vanilla and eggs and beat for another 2 minutes. Set aside.
Add the flour, salt and baking powder to a large mixing bowl and give it a stir to mix.
Run the mixer on the lowest speed and gradually add the flour mixture, allowing time to incorporate between additions.
Remove the bowl from the mixer, add the cranberries and pistachios and mix through with a spatula.
Divide the dough in half.
Wet your hands (the dough is extremely sticky) and shape each half portion of the dough into a log shape about 25cm in length. The logs won’t look wide enough to “become” biscotti, but the mixture will spread during baking and end up being wider than the shaped log.
Place the logs onto the prepared baking sheets and bake for 35 minutes.
Remove the biscotti logs from the oven and allow to cool for 30 minutes.
Turn the oven setting down to 130℃.
Slice the logs diagonally into 1cm thick slices.
Lay the slices flat onto the same baking sheets and dry in the oven for about 50 minutes. Feel the biscotti – it should be hard and shouldn’t give when you press it between your fingers.
Cool the biscotti on a cooling rack before packing them into a glass jar.

Profiteroles

Profiteroles

There is absolutely no “hidden tricks” when it comes to baking perfect profiteroles! Follow the instructions and you will have the satisfaction of perfect fresh profiteroles on your teatime table.

250ml boiling water
125ml butter, cubed
250ml cake flour
2,5ml salt
4 eggs
80g dark chocolate, melted
1 batch crème pâtisserie (search this blog for the recipe)

Preheat your oven to 190℃ and line a large baking sheet with baking paper.
Pour the water into a cast-iron/heavy-bottom saucepan and bring to a rapid boil.
Add the cubed butter and stir until melted.
Add the salt to the cake flour and then add it all to the saucepan with boiling water-butter, at once.
Stir vigorously with a wooden spoon until the mixture comes together in a ball in the centre of the saucepan.
Take the saucepan from the heat and add the eggs, one at a time.
Beat the mixture well. The egg should be completely incorporated before you add the next one. This is a real arm workout but do try and work quick as you need the steam from the heat!
Spoon a heaped teaspoon of the mixture on to the prepared baking tray, leaving enough space in between as the profiteroles expand quite a lot while baking.
Place in the oven and bake for 20 minutes.
Turn the oven temperature down to 160℃ and bake for another 20 minutes.
Take the tray from the oven and immediately slit a small sharp knife into the bottom of each profiterole, making as small a cut as possible, for the steam to escape.
Cool completely on a cooling rack.
Cut the profiteroles open and fill each of them with crème pâtissière (search the recipe on this blog: Custard Buns) or whipped cream.
Spoon some melted chocolate on to each filled pastry and set aside for the chocolate to set.
Serve with a smile!

Banana-Caramel Muffins

Banana-Caramel Muffins

This is a recipe for banana-bran muffins that belong on the breakfast/brunch table but if you want to add some decadence …. well, this caramel sauce does exactly that without overpowering! Yields about 16 muffins.

For the muffins:
300g cake flour
100g bran flakes
300g brown sugar
1,2ml salt
50ml cultured buttermilk
15ml bicarbonate of soda
450ml cultured buttermilk
2 eggs
100ml vegetable oil
5ml vanilla essence
250ml mashed banana
about 3 extra bananas

Preheat your oven to 180℃ and line a 12-hole muffin tin with paper cups.
Add the cake flour, bran flakes, brown sugar and salt to a mixing bowl, stir through and set aside.
Pour the 50ml buttermilk into a small bowl and add the bicarbonate of soda to it. Stir through and set aside.
Add the 450ml buttermilk, eggs, vegetable oil and vanilla to a wide-mouth jug and whisk together by hand.
Pour the buttermilk-bicarbonate mixture into the liquid mixture and stir through.
Pour the liquid ingredients into the bowl with the dry ingredients.
Add the mashed banana and mix together until JUST mixed through.
Spoon the batter into the prepared muffin tins. At this stage I like to add another piece of banana of about 4 cm, which I simply place on top of the muffin batter.
Bake the muffins for 18 – 20 minutes and cool on a cooling rack

For the caramel sauce:
250ml sugar
60ml butter
a pinch of salt
125ml cream
15ml vanilla

Add all the ingredients to a small saucepan over low heat.
Stir together with a whisk until the butter has melted and the sugar has dissolved.
Simmer the sauce over a medium heat while whisking continuously until the sauce thickens. This will take about 8 minutes.
Take the caramel sauce from the heat and allow to cool for 10 minutes – the sauce will thicken more as it cools down.
Spoon the warm caramel onto the muffins and serve.

Creamy Prawn Spaghetti

Creamy Prawn Spaghetti

The sauce for this prawn dish is absolutely delicious! It is creamy and cheesy and brings all the flavours together. No bread is needed to mop up the sauce as the pasta absorbs it all. Give it a try, you will love it! Feeds 4 hungry adults.

250g spaghetti
30ml butter
400g prawns
3 cloves of garlic, minced
65ml dry white wine
250ml cream
125ml chicken stock
50g parmesan cheese, grated
a handful of parsley, chopped

Cook the spaghetti according to the packet instructions.
Place a large saucepan onto medium-high heat and add the butter.
Add the prawns and garlic and stir-fry for 2 minutes.
Now add the white wine and cook until reduced by half.
Add the cream, chicken stock and parmesan and turn the heat down to a slow simmer. Cook until the sauce has thickened.
Add the cooked spaghetti to the mixture and give everything a thorough mix-through.
Finish with a scattering of parsley before serving.

Tropical Tapioca Dessert

Tropical Tapioca Dessert

Easy, comforting and an absolute crowd pleaser!!

2 tins of coconut milk
100ml milk
250ml tapioca
a pinch of salt
83ml sugar
83ml butter
4 eggs
5ml vanilla
6 fresh guavas
83ml coconut shavings

Preheat your oven to 180℃ and grease a 18cm X 28ccm ovenproof dish.
Pour the 2 tins of coconut milk and the 100ml of milk into a saucepan and bring to the boil.
Add the tapioca and salt to the milk, turn the heat down to low and gently simmer for 25 minutes. Stir the mixture every now and then to prevent the tapioca from clotting and sticking to the saucepan.
Remove the saucepan from the heat and stir in the sugar and butter.
Add the eggs and vanilla to a mixing bowl and whisk together.
Pour the egg mixture into the tapioca while stirring.
Pour the mixture into the prepared baking dish.
Peel the guavas and randomly press them into the tapioca.
Place in the oven and bake for 45 minutes.
Sprinkle the warm dessert with coconut shavings and serve with pouring custard.