Call them crumpets, flapjacks or pancakes but they are all divine with this fresh blueberry sauce!
For the crumpets: 2 eggs 300ml milk 200g self-raising flour 1,2ml baking powder a pinch of salt 100g butter, melted and cooled 150g blueberries
For the blueberry sauce: 300g blueberries the juice of 1 orange 62ml sugar 30ml water
Making the crumpets: Add the eggs and milk to a mixing bowl and whisk together by hand. Sift the flour, baking powder and salt into the bowl and whisk thoroughly to combine. Pour the cooled butter into the mixture and add the blueberries. Gently stir the mixture through so that the blueberries don’t break up as this dilute your batter. Place a frying pan on medium-high heat and add a small amount of vegetable oil. Spoon about two large tablespoonfuls of batter per crumpet into the pan. Cook for about 2 minutes until set and starting to bubble around the edges. Flip the crumpet and cook for another 2 minutes or until golden. Remove from the pan and keep warm. Keep going until you have used all the batter.
Making the blueberry sauce: Add the blueberries to a small saucepan and pour in the orange juice, sugar and water. Bring the mixture to a boil while stirring to dissolve the sugar and cook for about 3 minutes, until the berries release their juice and the liquid becomes syrupy. Cool the sauce to room temperature.
Serve the warm crumpets with the blueberry sauce and a dollop of yoghurt.
These biscuits do not look like much but they are soooo good! They have a wonderful snap and the chopped chocolate adds a sharp and delicious chocolatey fabulousness!!
125g butter 175g caster sugar 225g flour 10ml baking powder 80g dark chocolate, finely chopped BUT NOT SHAVED the grated zest of 2 oranges 15ml fresh orange juice
Preheat your oven to 180℃ and line two baking sheets with baking paper. Add the butter and sugar to the bowl of a stand mixer fitted with the paddle attachment and beat together on high speed. The mixture should be fluffy and airy. Remove the bowl from the mixer and sift the flour and baking powder into the bowl. Stir together. Add the chopped chocolate, orange zest and orange juice to the mixture and mix together with a spatula. Flour a work surface and roll the dough to a 0,5cm thickness. Cut out with a biscuit cutter of your choice and place on the prepared baking sheets. Bake the biscuits for 20 minutes. Remove the baking sheets from the oven and leave the biscuits on the sheets for 5 minutes before cooling it completely on a cooling rack. Store the biscuits in an airtight glass jar.
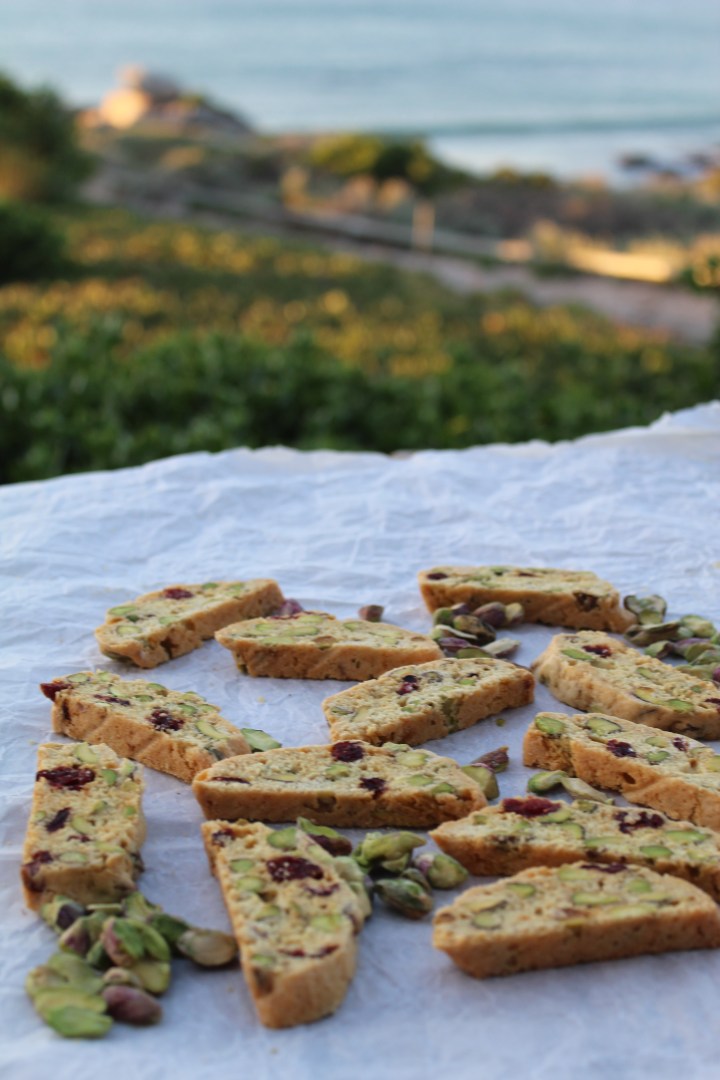
I love to bake snacks that can be kept in a glass jar for a few weeks (very optimistic!) and biscotti has a place of honour amongst them. The recipe yields about 36 slices and can be kept for 3-4 weeks when stored in a sealed glass container.
Preheat your oven to 160℃ and line two large baking sheets with baking paper. Add the oil and sugar to the bowl of a stand mixer fitted with the paddle attachment and beat on high speed until well blended. Add the vanilla and eggs and beat for another 2 minutes. Set aside. Add the flour, salt and baking powder to a large mixing bowl and give it a stir to mix. Run the mixer on the lowest speed and gradually add the flour mixture, allowing time to incorporate between additions. Remove the bowl from the mixer, add the cranberries and pistachios and mix through with a spatula. Divide the dough in half. Wet your hands (the dough is extremely sticky) and shape each half portion of the dough into a log shape about 25cm in length. The logs won’t look wide enough to “become” biscotti, but the mixture will spread during baking and end up being wider than the shaped log. Place the logs onto the prepared baking sheets and bake for 35 minutes. Remove the biscotti logs from the oven and allow to cool for 30 minutes. Turn the oven setting down to 130℃. Slice the logs diagonally into 1cm thick slices. Lay the slices flat onto the same baking sheets and dry in the oven for about 50 minutes. Feel the biscotti – it should be hard and shouldn’t give when you press it between your fingers. Cool the biscotti on a cooling rack before packing them into a glass jar.
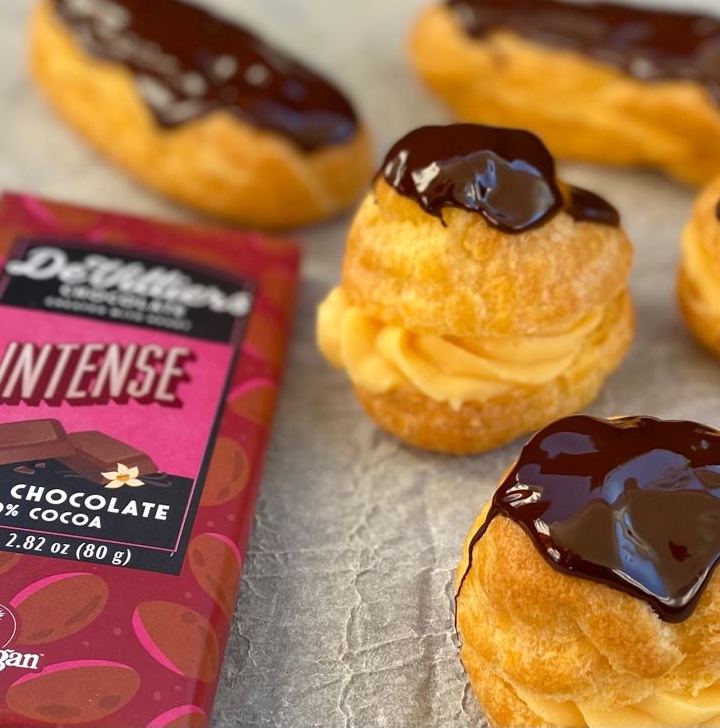
There is absolutely no “hidden tricks” when it comes to baking perfect profiteroles! Follow the instructions and you will have the satisfaction of perfect fresh profiteroles on your teatime table.
250ml boiling water 125ml butter, cubed 250ml cake flour 2,5ml salt 4 eggs 80g dark chocolate, melted 1 batch crème pâtisserie (search this blog for the recipe)
Preheat your oven to 190℃ and line a large baking sheet with baking paper. Pour the water into a cast-iron/heavy-bottom saucepan and bring to a rapid boil. Add the cubed butter and stir until melted. Add the salt to the cake flour and then add it all to the saucepan with boiling water-butter, at once. Stir vigorously with a wooden spoon until the mixture comes together in a ball in the centre of the saucepan. Take the saucepan from the heat and add the eggs, one at a time. Beat the mixture well. The egg should be completely incorporated before you add the next one. This is a real arm workout but do try and work quick as you need the steam from the heat! Spoon a heaped teaspoon of the mixture on to the prepared baking tray, leaving enough space in between as the profiteroles expand quite a lot while baking. Place in the oven and bake for 20 minutes. Turn the oven temperature down to 160℃ and bake for another 20 minutes. Take the tray from the oven and immediately slit a small sharp knife into the bottom of each profiterole, making as small a cut as possible, for the steam to escape. Cool completely on a cooling rack. Cut the profiteroles open and fill each of them with crème pâtissière (search the recipe on this blog: Custard Buns) or whipped cream. Spoon some melted chocolate on to each filled pastry and set aside for the chocolate to set. Serve with a smile!
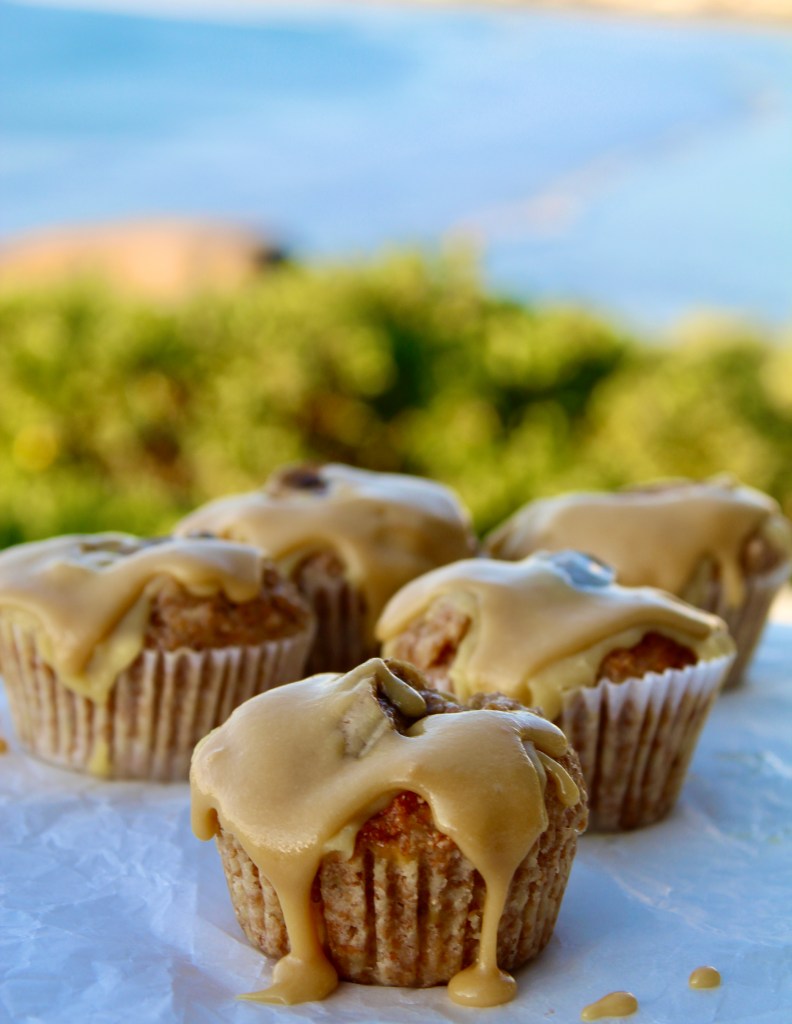
This is a recipe for banana-bran muffins that belong on the breakfast/brunch table but if you want to add some decadence …. well, this caramel sauce does exactly that without overpowering! Yields about 16 muffins.
For the muffins: 300g cake flour 100g bran flakes 300g brown sugar 1,2ml salt 50ml cultured buttermilk 15ml bicarbonate of soda 450ml cultured buttermilk 2 eggs 100ml vegetable oil 5ml vanilla essence 250ml mashed banana about 3 extra bananas
Preheat your oven to 180℃ and line a 12-hole muffin tin with paper cups. Add the cake flour, bran flakes, brown sugar and salt to a mixing bowl, stir through and set aside. Pour the 50ml buttermilk into a small bowl and add the bicarbonate of soda to it. Stir through and set aside. Add the 450ml buttermilk, eggs, vegetable oil and vanilla to a wide-mouth jug and whisk together by hand. Pour the buttermilk-bicarbonate mixture into the liquid mixture and stir through. Pour the liquid ingredients into the bowl with the dry ingredients. Add the mashed banana and mix together until JUST mixed through. Spoon the batter into the prepared muffin tins. At this stage I like to add another piece of banana of about 4 cm, which I simply place on top of the muffin batter. Bake the muffins for 18 – 20 minutes and cool on a cooling rack
For the caramel sauce: 250ml sugar 60ml butter a pinch of salt 125ml cream 15ml vanilla
Add all the ingredients to a small saucepan over low heat. Stir together with a whisk until the butter has melted and the sugar has dissolved. Simmer the sauce over a medium heat while whisking continuously until the sauce thickens. This will take about 8 minutes. Take the caramel sauce from the heat and allow to cool for 10 minutes – the sauce will thicken more as it cools down. Spoon the warm caramel onto the muffins and serve.
2 tins of coconut milk 100ml milk 250ml tapioca a pinch of salt 83ml sugar 83ml butter 4 eggs 5ml vanilla 6 fresh guavas 83ml coconut shavings
Preheat your oven to 180℃ and grease a 18cm X 28ccm ovenproof dish. Pour the 2 tins of coconut milk and the 100ml of milk into a saucepan and bring to the boil. Add the tapioca and salt to the milk, turn the heat down to low and gently simmer for 25 minutes. Stir the mixture every now and then to prevent the tapioca from clotting and sticking to the saucepan. Remove the saucepan from the heat and stir in the sugar and butter. Add the eggs and vanilla to a mixing bowl and whisk together. Pour the egg mixture into the tapioca while stirring. Pour the mixture into the prepared baking dish. Peel the guavas and randomly press them into the tapioca. Place in the oven and bake for 45 minutes. Sprinkle the warm dessert with coconut shavings and serve with pouring custard.
This is the perfect make-ahead dessert when entertaining as it needs to rest in the refrigerator for 24 hours before baking. With its crunchy outside top and soft, squidgy inside it is best served in small portions as it is very rich. Leftovers are equally good when cold!
10 slices white bread, 0,5cm thick 160g dark chocolate, chopped 75g butter 450ml cream 60ml dark rum 110g caster sugar a pinch of cinnamon 3 eggs extra pouring cream for serving
Grease a 18cm X 28cm ovenproof ceramic dish. Remove the crusts from the bread slices and then cut each slice into 4 triangles. Set aside. Add the chocolate, butter, cream, rum, sugar and cinnamon to a heatproof bowl set over a saucepan of barely simmering water. Stir the mixture every now-and-then until the butter and chocolate has melted and the sugar has dissolved. Remove the bowl from the heat and give it a good stir to amalgamate the ingredients. Put aside. Add the eggs to a large mixing bowl and whisk together. Pour the chocolate mixture over the eggs in a thin stream while whisking continuously. Remember: pour slowly, whisk quickly. Spoon a 1cm layer of chocolate mixture into the base of the baking dish and arrange half the bread triangles in overlapping rows on this chocolate layer.
Pour half of the remaining chocolate mixture as evenly as you can, over the bread. Arrange the rest of the triangles on top of this layer, finishing off with a layer of chocolate.
Gently press down the bread with a spoon so that it gets covered evenly with the liquid as it cools. Cover the dish with plastic wrap and allow to cool completely. Place the dish in the refrigerator for 24 hours.
Cooking the pudding: Preheat your oven to 180℃. Remove the plastic wrap and bake the pudding for 35 minutes. Allow to stand for 10 minutes before serving with pouring cream, custard or ice cream.
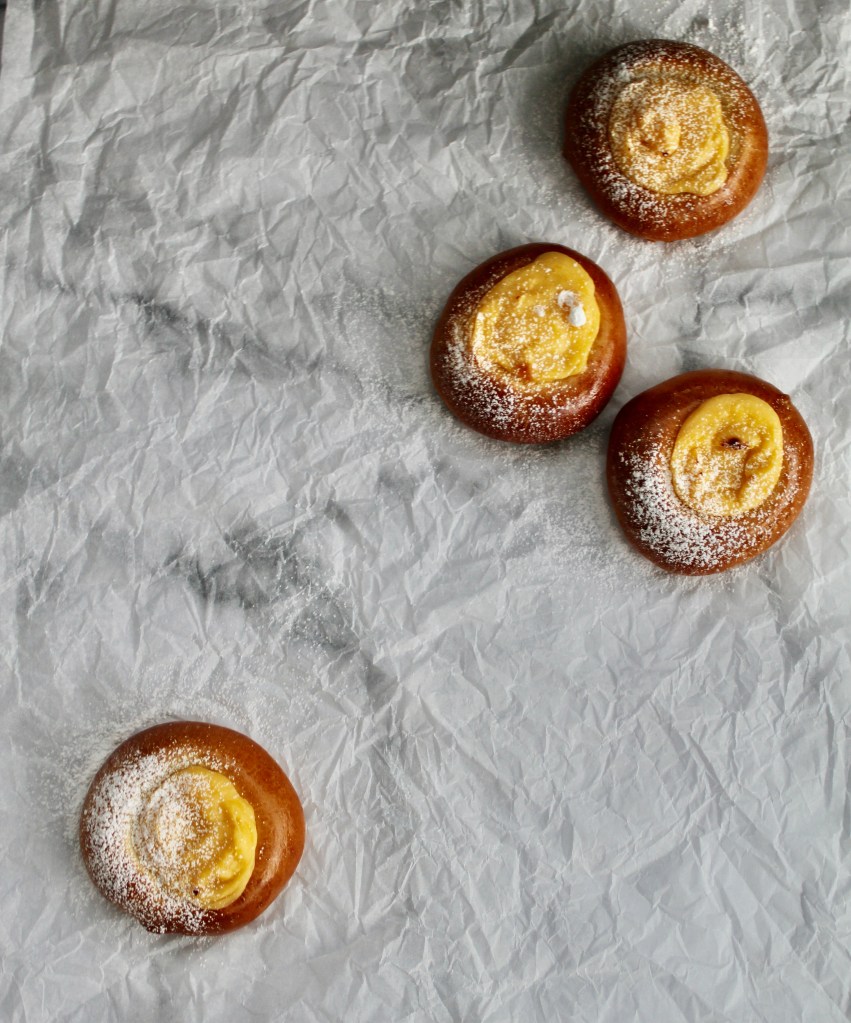
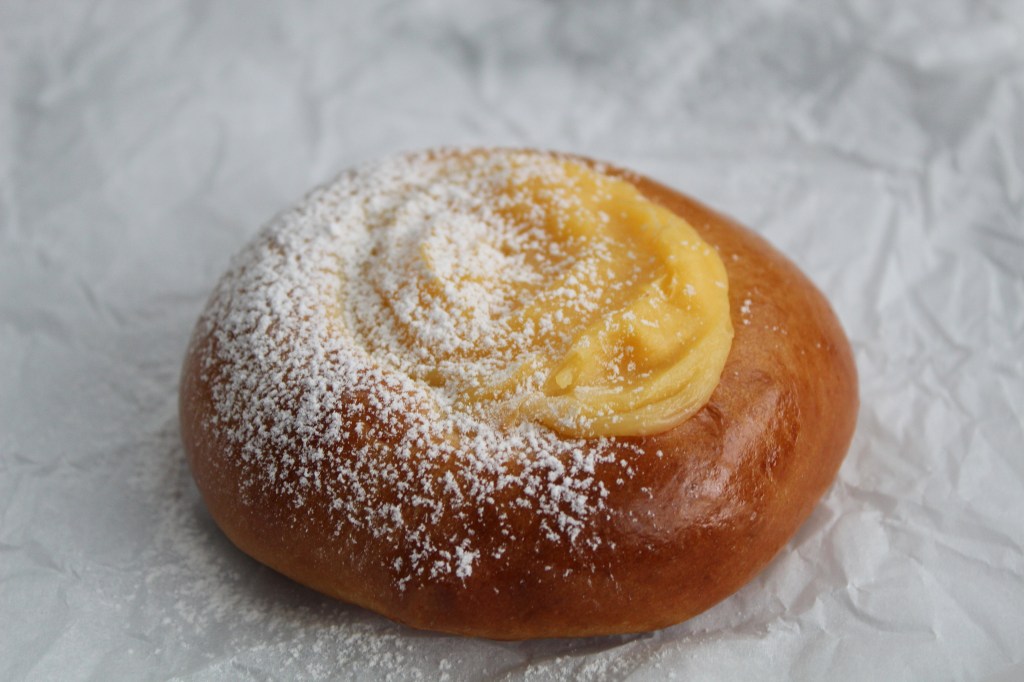
Who can say no to an espresso and pain à la crème on a sidewalk in Paris? I assure you, you might be in your own home but your tastebuds will be fooled into believing you were there….
For the buns: Line a large baking sheet with baking paper and put aside. Add the flour and salt to the bowl of a stand mixer fitted with the dough hook. Warm the milk until tepid and pour it into a mixing bowl. Add the butter, instant yeast and sugar to the milk and stir until the sugar has dissolved. Turn the mixer on to a low speed and add the liquids. Mix/knead for about 3 minutes. The dough will be very sticky! Turn the mixer to medium speed and knead for another 6 minutes. You are aiming for a soft, smooth, elastic dough. Divide the dough into 10 equal pieces – weigh them on a scale, they should be around 60g each. Roll each portion into a ball and place on the prepared baking sheet. Flatten the dough ball slightly with your hand. Now make an indent with a small cup/glass, pushing down onto the dough. Spray some plastic wrap with cooking spray and cover the buns lightly. Set aside in a warm place for 90 minutes.
For the crème pâtissière: Add the corn flour to a small bowl and pour a small amount of milk in to the bowl while stirring. You want to make a slurry, which is basically a runny, pourable paste. Put aside. Add the egg yolks and 50g caster sugar to a mixing bowl. Stir the corn flour slurry into the egg mixture. Set aside. Pour the milk into a small saucepan and add the other 50g caster sugar. Place the saucepan on medium heat and stir until the sugar has dissolved. Take the saucepan from the heat as soon as tiny bubbles start to appear around the edges of the pan. Drizzle the warm milk mixture into the egg mixture while whisking vigorously. Pour slowly, whisk quickly! Now pour the mixture from the mixing bowl, back into the saucepan and place it on a medium-low heat. Stir continuously until the mixture has thickened. Allow to cook for 30 seconds before removing it from the heat. Add the vanilla and stir to mix. Pour the crème pâtissière into a shallow bowl and place some plastic wrap directly on the surface. This will prevent a skin from forming while the custard cools down. Place in the refrigerator and allow to cool completely.
Preheat your oven to 180℃. Take the same cup/glass that you used to make the indents in the buns, and press down onto the exact same area again. Brush the buns with egg wash. Whisk the cold créme pâtissière to soften it. Spoon about 20ml or more if you can, of crème pâtissière into each round indent you have made. Bake the custard buns for 20 minutes. The custard filling will rise up as it bakes but do not panic, it will fall back on itself once it cools. Cool the buns to room temperature. Sieve with icing sugar and serve with coffee.
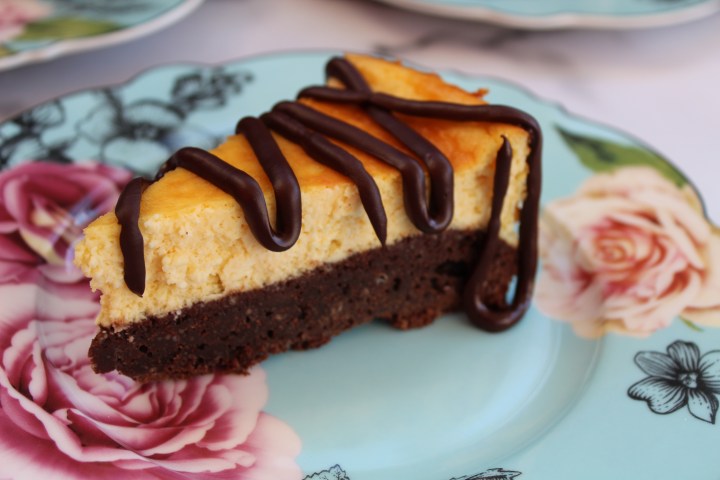
The best of two worlds!! A delicious chocolatey brownie base with a velvet baked cheesecake topping!
For the brownie base: 115g butter 115g dark chocolate, chopped 200g caster sugar 2 eggs 50ml milk 115g flour
For the cheesecake topping: 500g cream cheese, room temperature 125g caster sugar 3 eggs 5ml vanilla 125ml Greek yoghurt
Preheat your oven to 180℃ and grease a 22cm loose-bottom cake tin. Add the butter and chopped chocolate to a heatproof mixing bowl and place it over a saucepan of barely simmering water. Stir every now and then until melted. Remove the bowl from the head and add the sugar. Whisk until the ingredients are amalgamated. Add the eggs and milk and whisk to mix. Add the flour and stir through until the mixture is just blended. Scrape the mixture into the prepared cake tin and even it out with a spatula. Place in the oven and bake for 25 minutes. Remove and set aside. Lower the oven temperature to 160℃. Add the cream cheese, sugar, eggs and vanilla to the bowl of a stand mixer fitted with the paddle attachment. Beat together on high speed until you have a smooth mixture. Scrape the bowl down once or twice in between mixing. Remove the bowl from the mixer and add the yoghurt. Stir the yoghurt through the cheesecake mixture. Pour the mixture onto the baked brownie base. Place in the oven and bake for 55 minutes.
Remove the cake from the oven and place it on a cooling rack to cool completely. Cover with plastic wrap and refrigerate for a minimum of 4 hours, but preferably overnight. Run a knife around the edge of the cake before removing the sides of the cake tin. Cut into slices and drizzle with melted chocolate to serve.
Warm the milk and pour it into a mixing bowl. Add the yeast and stir until dissolved. Cover the bowl with a tea towel and set aside in a warm place for 10 minutes. Add the butter and sugar to the bowl of a stand mixer fitted with the paddle attachment. Set the machine on medium-high speed and cream the ingredients together. Add the egg and beat to incorporate into the mixture. Add the yeast and milk mixture and mix again. Remove the bowl from the mixer and add half a cup of flour at a time, stirring the flour into the mixture with a wooden spoon. Keep going until all of the flour has been incorporated. Dust the dough with 15ml of flour and cover with plastic wrap. Set aside and allow to proof for 30 minutes.
Preheat your oven to 200℃ and line a baking sheet with baking paper. Lightly coat your hands with vegetable oil and knead the dough 5 or 6 times. The dough will be very sticky! Divide the dough into 4 equal pieces. Shape each piece into an oval shape and place it on the prepared baking sheet. Allow to rise for 15 minutes. Bake the rolls for 8 minutes. Remove the baking sheet from the oven and lightly brush the rolls with vegetable oil. You may sprinkle the rolls with brown sugar at this stage. Return the rolls to the oven and bake for a further 10 minutes. Remove from the oven and cool for 5 minutes before serving.