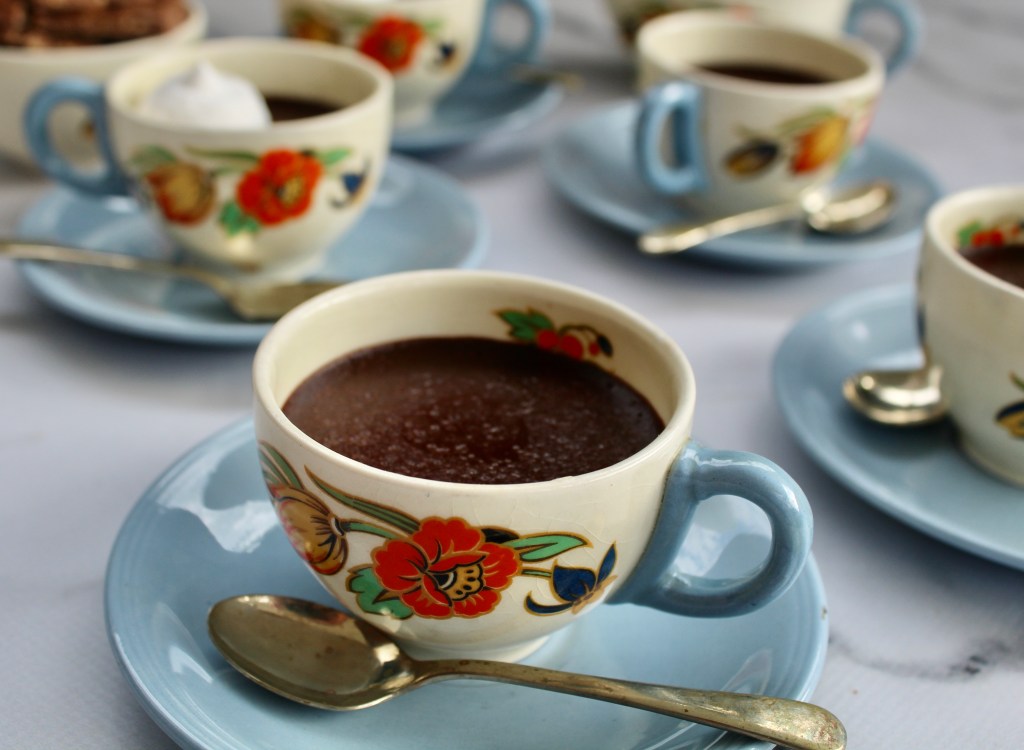
This traditional dessert, also known as Pots de Crème, is super easy to make. It is a rich and creamy no-bake dessert and most of all, it is deliciously smooth and not airy like a mousse. I serve this dessert in espresso cups as I find a larger serving too rich and overwhelming. This recipe yields 10 espresso-cup servings or 6 individual servings in standard ramekins.
250ml cream 100ml milk 160g dark chocolate, minimum 70% cocoa, chopped 40g brown sugar 3 egg yolks 5ml vanilla
Pour the cream and milk into a saucepan and slowly bring it to a simmer. Take the saucepan from the heat the moment it starts to simmer. Add the chopped chocolate and stir the mixture until the chocolate has melted completely. Add the sugar, egg yolks and vanilla to a mixing bowl and whisk with electric beaters until pale and fluffy. Drizzle the chocolate mixture onto the egg mixture, whisking continuously. Remember: pour slowly, whisk quickly! Keep going until you have added all of the chocolate mixture. Divide the mixture between ramekins/espresso cups and allow to cool completely. Place the cups on a baking sheet and cover with plastic wrap. Refrigerate for at least an hour or until you are ready to serve. I serve my chocolate pots as they are but this dessert is often served with Chantilly cream.
Chocolate and pear is a match made in heaven and with this delicious chocolate pastry as a base, few desserts will be able to compare to this tart!
Poached pears: 3 ripe pears 750ml water 250ml sugar 15ml lemon juice
Chocolate pastry: 80g dark chocolate, at least 70% cocoa 175g butter, cubed 230g caster sugar 4 egg yolks 10ml vanilla 15ml milk 50g cocoa powder 350g cake flour
Chocolate frangipane: 120g dark chocolate, at least 70% cocoa 120g butter, cubed 120g caster sugar 5ml vanilla 2 eggs 125g ground almonds 25g flour
Poaching the pears: Pour the water into a small saucepan and add the sugar and lemon juice. Turn the heat on to medium and stir until the sugar has dissolved. Peel, halve and core the pears and add to the poaching liquid. Cut a square of baking paper that is large enough to cover the saucepan. Scrunch the paper up and then slide it down into the saucepan until it touches the poaching liquid. Bring the poaching liquid to the boil, reduce the heat and simmer gently until a wooden skewer can easily be inserted into the pear quarters. Turn off the heat and allow the fruit to cool in the poaching liquid. Remove the pear once it has cooled and keep aside. Simmer the poaching liquid until it reduces to a syrup. Reserve this to glaze the tart with once it comes from the oven.
For the chocolate pastry: Chop and melt the chocolate in a heatproof bowl set over a saucepan of simmering water, making sure that the bottom of the bowl is not in contact with the water. Stir until silky smooth and completely melted. Take the bowl from the heat and allow to cool slightly. Add the cubed butter, sugar, egg yolks, vanilla and milk to the bowl of a food processor and blitz together. Pour in the slightly cooled chocolate and pulse to blend in. Sift the cocoa powder and flour into the chocolate mixture and blitz until the mixture comes together in a smooth ball of pastry. Wrap the pastry with plastic wrap and store in the refrigerator for one hour.
Lightly spray a tart tin with baking spray. Roll the pastry to a thickness of 3mm and line the baking tin on the bottom and sides. Place the pastry case into the freezer for 1 hour.
Preheat your oven to 180℃. Line the pastry case with baking paper and baking beans and bake for 15 minutes. Set aside to cool.
For the chocolate frangipane: Keep your oven on 180℃. Melt the chocolate in a heatproof bowl set over a saucepan of simmering water, making sure that the bottom of the bowl is not in contact with the water. Stir until completely melted. Remove from the heat and set aside to cool slightly. Add the butter and sugar to the bowl of a stand mixer fitted with the paddle attachment. Cream the butter and sugar until light and fluffy. Add the vanilla and the eggs and beat together, scraping down once or twice, until well blended. Add the almonds and flour and fold into the egg mixture with a spatula. Pour in the melted chocolate and stir once again to incorporate, with the spatula. Spread the frangipane mixture onto the baked pastry case. Slice the pears and position each sliced half onto the chocolate frangipane, spacing it so that there is enough space for all of the pear. Bake the tart for 45 minutes. Remove from the oven and brush the reduced poaching liquid (syrup) onto the warm tart. Allow to cool in the baking mould. Serve with a sprinkling of icing sugar or a scoop of vanilla ice cream.
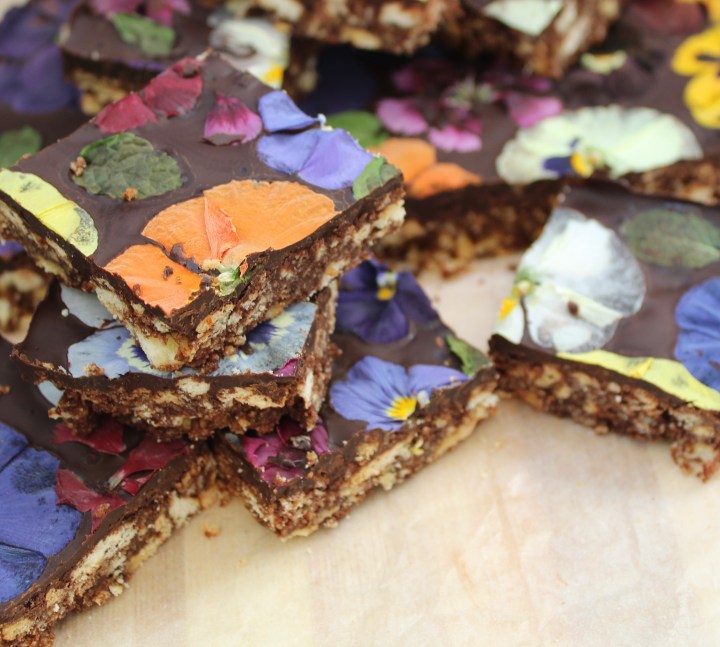
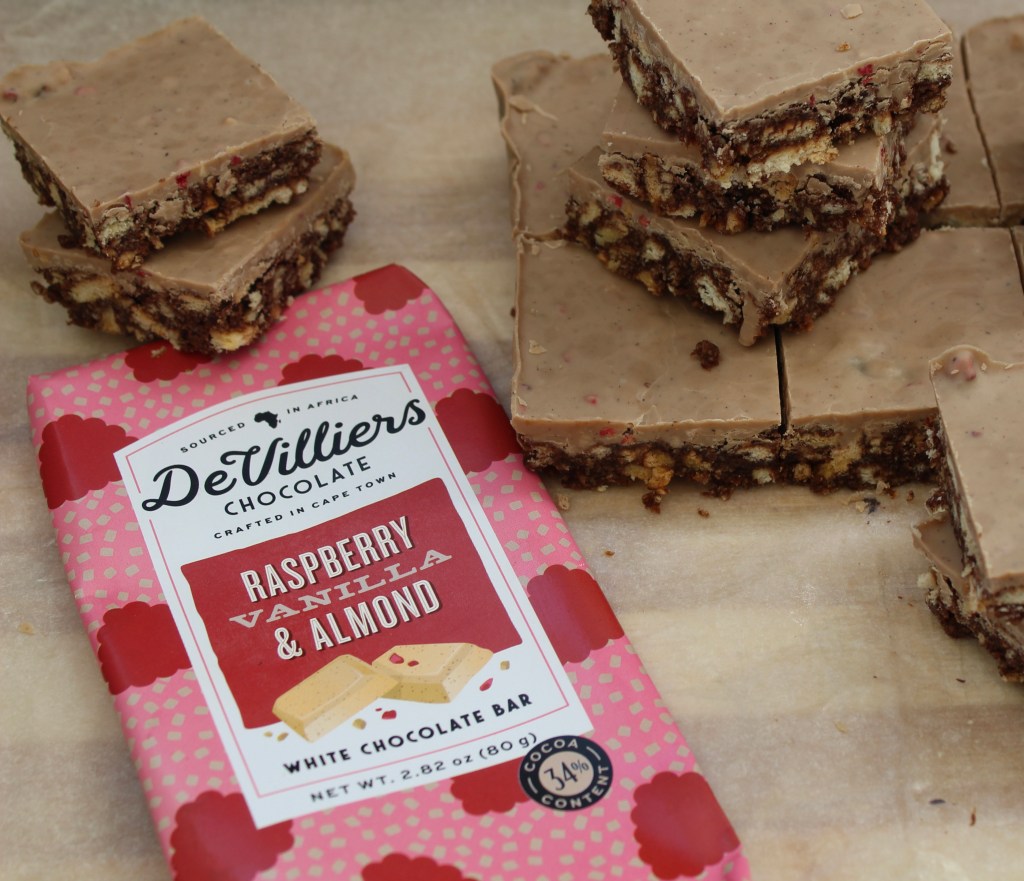
This is an old favourite which most of us have eaten in one form or the other. The addition of the chocolate layer on top adds a creaminess and turns a kids-party-favourite into an adult snack! Keeps well in a sealed container at room temperature.
2 X 200g packets plain biscuits 250g butter 60ml condensed milk 30ml golden syrup 45ml cocoa powder, sifted 30 sugar 160g dark chocolate; I used De Villiers Dark Chocolate, Intense 160g white chocolate; I used De Villiers White Chocolate, Raspberry, Vanilla and Almonds
Line two 20cm X 20cm baking tins with baking paper. Put the biscuits into a plastic bag and crush them with a rolling pin. Pour the biscuit pieces into a large mixing bowl. Add the butter, condensed milk, syrup, cocoa powder and sugar to a small saucepan and melt together over a low heat. Stir the mixture until completely smooth and amalgamated. Pour the runny mixture onto the biscuit pieces and mix well, making sure that all the pieces are covered in it. Divide the mixture between the two prepared baking tins and smooth the top with the back of a spoon. Press down to compact the mixture. Refrigerate for 10 minutes. Chop the dark chocolate into small pieces and add it to a heatproof bowl that sits on a saucepan of simmering water. Stir every now and then until the chocolate is melted. Pour onto one of the baking tins with brownies. Repeat the process with the white chocolate and pour over the other batch of brownies. If you want to prettify the brownies with edible flowers, now is the time! Place the two baking tins in the refrigerator for 30 minutes. Slice before serving.
This is a savoury dish that will get conversations (and your tastebuds) going….. Serves 6 people.
500ml bread flour 190ml cocoa powder 5 eggs 2,5ml salt
For the filling: 250ml ricotta cheese 80g dark/bitter chocolate, finely chopped a pinch of salt
100g butter 20 sage leaves
Sift the flour, cocoa powder and salt together onto a clean work surface. Make a well in the centre and put in the eggs. Mix the eggs with your fingers and gradually draw in the flour and cocoa mixture to form a soft, but not sticky, dough. Add more flour or egg, if needed, to get the right consistency. Knead for 10 minutes until you have a smooth and elastic dough. Wrap the dough in plastic wrap and leave in the fridge to chill for one hour.
Mix the ricotta, chopped chocolate and a pinch of salt with a wooden spoon until smooth. Roll the pasta through a pasta machine. Lay one sheet of pasta flat and form walnut-sized balls with the ricotta mixture. Place the ricotta balls onto the sheet of pasta. Wet the area around the ricotta-balls with water and lay a second sheet of pasta on top. Press down and around the ricotta balls so that the top sheet of pasta sticks. Cut individual ravioli shapes with a round cutter and cook them for three minutes in simmering water. Keep warm while making the sage-butter.
Add the butter to a small saucepan and place it on a high heat. Allow the butter to melt and then to caramelise – regulate the heat: you want the butter to turn brown and become nutty without burning. Add the sage leaves once the butter has browned and immediately turn off the heat. Be careful the butter will spatter as you add the sage.
Arrange the cooked ravioli on plates and spoon the butter and sage over. Serve with a crusty bread.
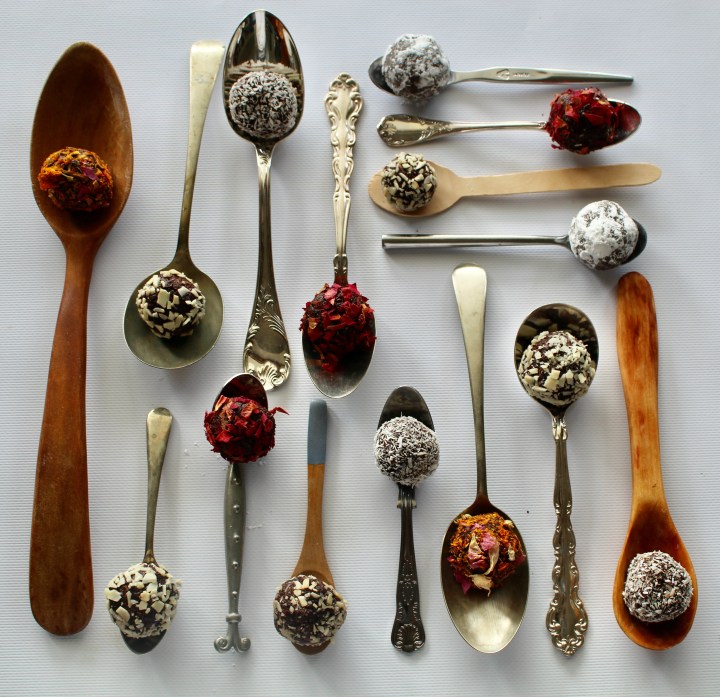
l make these truffles from cake off-cuts and sometimes from a slice or two of left-over cake. They are somewhere between a cake-pop and a traditional chocolate truffle but believe me, they are delicious and very more-ish!
160g De Villiers chocolate, chopped 5ml butter 30ml milk 80ml desiccated coconut 330ml cake crumbs (blitz two slices of cake in a food processor) 62ml icing sugar 20g almonds, chopped
For rolling the truffles: A handful of the following almonds, very finely chopped desiccated coconut cocoa powder dried rose petals icing sugar
Add the chocolate, butter and milk to a heatproof bowl and place over a saucepan with simmering water to melt. Stir every now and then until the chocolate is completely melted and the mixture amalgamated. Take the chocolate mixture from the heat and stir in the coconut, cake crumbs, icing sugar and chopped nuts. Keep mixing until all the ingredients are completely covered with chocolate. Roll the mixture into balls the size of walnuts and then roll them through the almonds/coconut/cocoa/rose petals/icing sugar. Keep the truffles in a sealed container at room temperature.
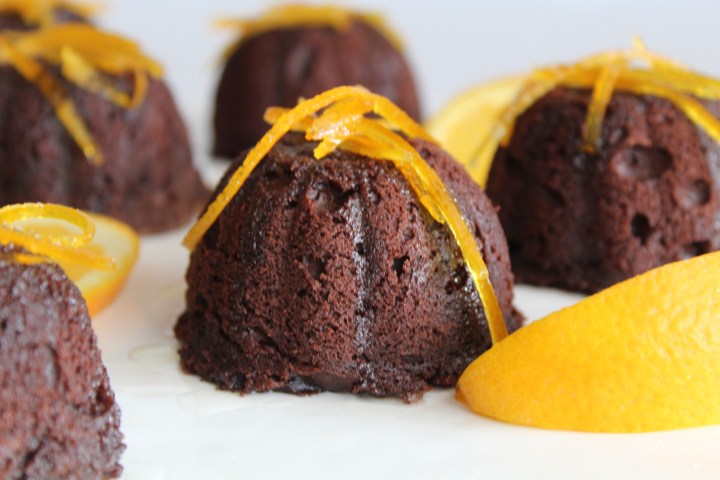
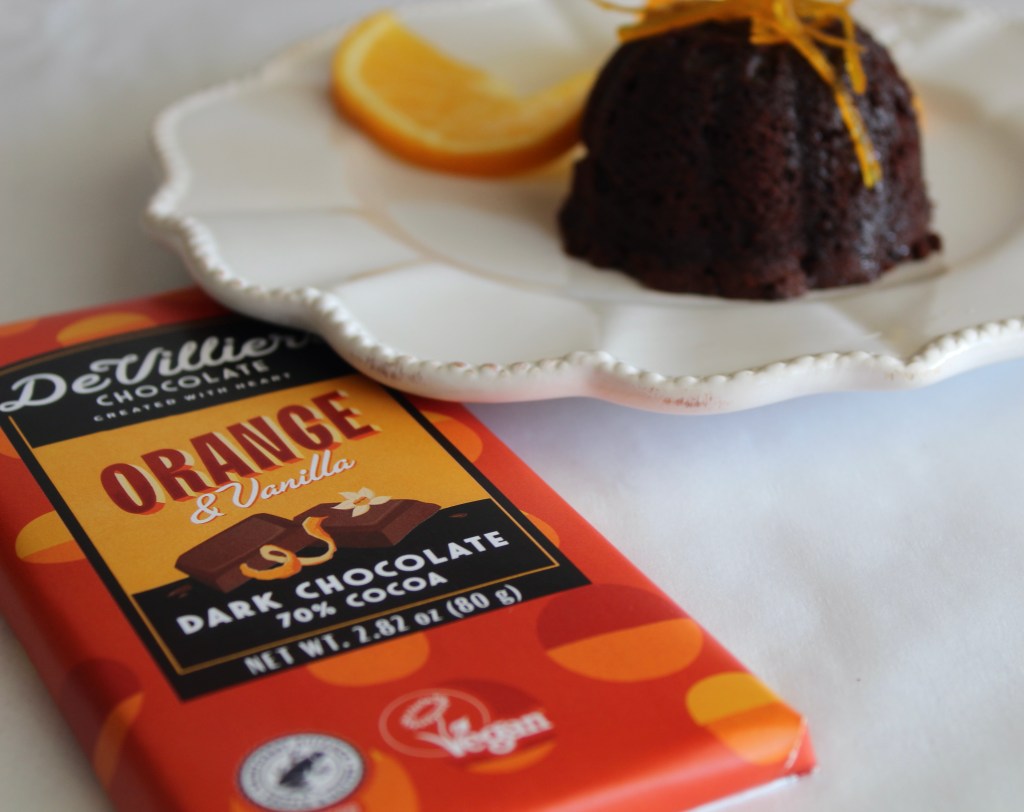
These cakes are like little jewels of chocolate and orange that explode in your mouth. This is an easy dessert when you are entertaining friends and want to impress.
Orange syrup: 200ml sugar 200ml water zest from one orange
For the cake: 320g De Villiers Chocolate: orange and vanilla, 70% dark or any other dark chocolate 250g butter, cubed 300g brown sugar 5 eggs 100g cake flour 100g self-raising flour 30ml orange liqueur or brandy
For the orange syrup: Strip the zest from the orange with a vegetable peeler. Put the strip of zest flat onto a chopping board and slice into needle-wide strips with a sharp knife. Cut all of the zest into these needle strips. Put aside. Add the sugar and water to a small saucepan and place on a high heat. Stir the mixture until all the sugar has dissolved. DO NOT stir again. Add the zest-needles to the mixture and bring the mixture to a boil, FOR ONE MINUTE. Take the saucepan from the heat and set aside to cool.
For the cake: Preheat your oven to 160℃. Grease 12 small baking moulds or a 12-hole standard muffin tin. Chop the chocolate. Melt the chocolate in a heatproof bowl over a saucepan with simmering water. Stir every now and then until all the chocolate has melted and the mixture is completely smooth. Remove from the heat and put aside. Add the butter and sugar to the bowl of a stand mixer fitted with the paddle attachment. Cream the butter and sugar until light and fluffy. Turn the mixer down to a medium speed and add the eggs one at a time, waiting for each to be incorporated. Turn the mixer to its lowest speed and add the slightly cooled chocolate, liqueur and flour. Scoop the batter into the prepared mould and bake for 30 minutes. Remove the cakes from the oven. Cut the cakes flush with the moulds you baked them in while still very warm. This will leave you with a flat surface to stand the cakes once you plate them. Spoon about 20ml of the cold syrup onto the cut-side of the warm cakes. Remove each cake from the mould (stand them up – the way you will serve them) and spoon the rest of the orange syrup over. Serve slightly warm or at room temperature.
This banana bread is delicious and chocolatey without being sweet and has incredible depth of flavour. I have included the substitutes for ingredients in brackets, to make it vegan. Enjoy this tea-time bread with a spread of salted butter.
220g banana, mashed (about three bananas) 5ml apple cider vinegar 35g butter, melted (nut butter) 300ml milk (soy milk) 100g sugar (Erythritol/any other sweetener) a pinch of salt 200g flour 2,5ml bicarbonate of soda 10ml baking powder 50g cacao powder 40g + 40g dark chocolate, chopped
Preheat your oven to 180℃ and line a small bread tin (22cm X 11cm) with baking paper. Mash the banana with a fork in a mixing bowl. Add the vinegar, melted butter and milk and mix through with a spatula. Add the sugar to this mixture and stir through. Sift the flour, bicarbonate of soda, baking powder and cacao powder into the bowl and mix well. Stir in 40g of the chopped chocolate. Spoon the batter into the prepared bread tin and sprinkle the other 40g of chopped chocolate on top. Bake the bread for 1 hour 35 minutes or until a toothpick inserted into the middle of the bread, comes out clean. Take the banana bread from the oven and lift the bread from the tin by holding the ends of the baking paper. Cool the bread completely on a cooling rack before cutting. Serve with a spreading of salted butter.
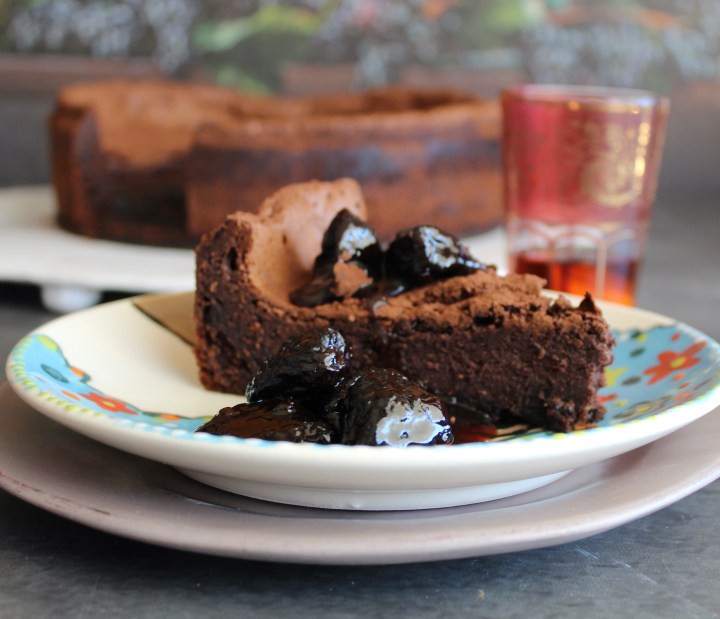
If you like chocolate and you like prunes, this flourless cake is what you have been waiting for!
400g prunes 200ml Port or Madeira 30g granulated sugar
For the prunes: Add the prunes, port and sugar to a small saucepan and place on medium heat. Stir to dissolve the sugar and then allow the mixture to simmer on a medium to low heat until the liquid is reduced to a syrup. Remove the saucepan from the heat and set aside to cool.
340g dark chocolate, chopped 170g butter, cubed 80g sugar 200g cooled prunes (from the mixture you have made above) 6 eggs, separated 1,2ml salt
Preheat your oven to 170℃. Grease a 22cm loose-bottom cake tin and dust the bottom and sides with cocoa powder. Add the chopped chocolate and butter to a heatproof bowl over simmering water. Allow to melt, stirring occasionally until completely melted and smooth. Add half the sugar (40g) to the chocolate mixture and stir until the sugar has dissolved. Remove the bowl from the saucepan. Now take 200g of the prunes from the port syrup, drain and chop into small pieces and add these to the chocolate mixture. Allow the mixture to cool for about 15 minutes, stirring occasionally. Add the egg yolks to the cooled chocolate and stir to combine.
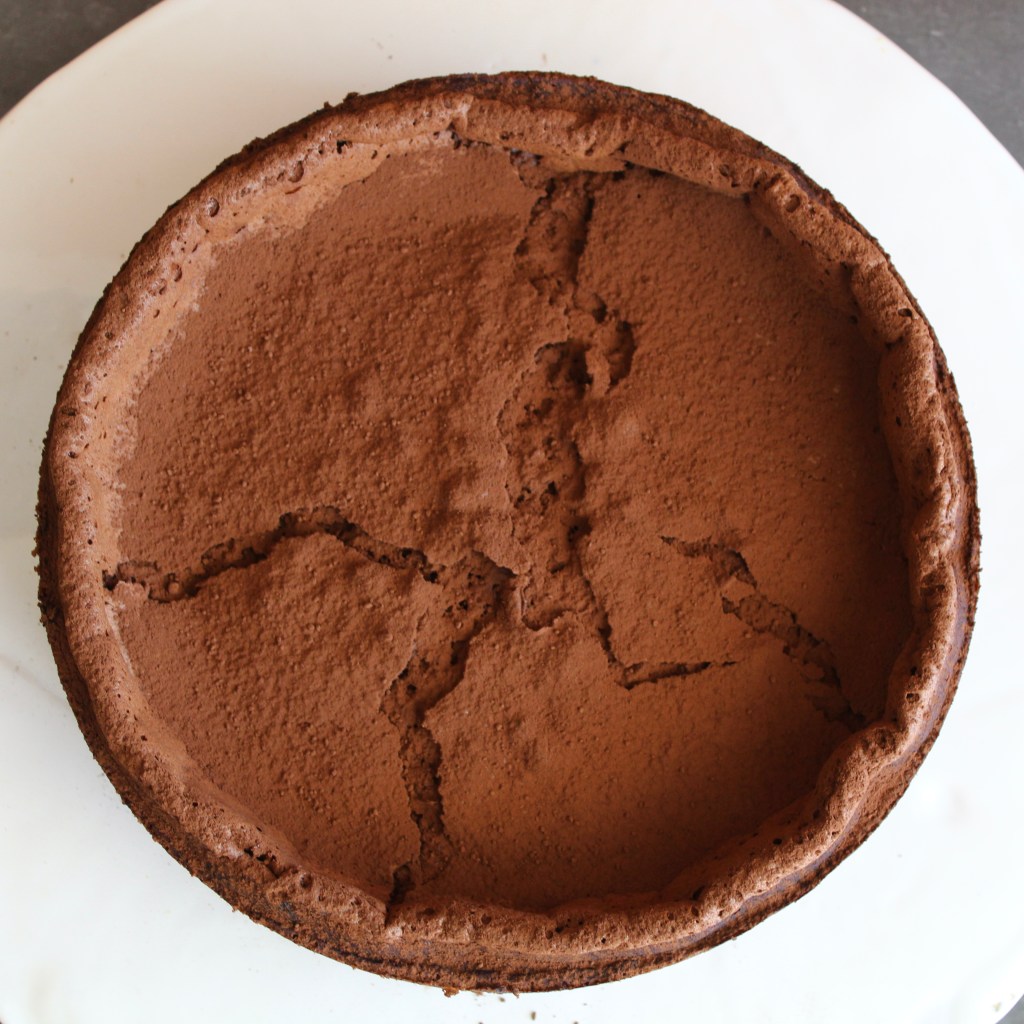
Add the egg whites and salt to the bowl of a stand mixer fitted with the whisk attachment. Whisk the whites until they form soft peaks. Now start adding the remaining half of the sugar, a teaspoon at a time, with the machine running. The whites should hold their shape and be glossy. Spoon a third of the whites into the chocolate mixture and stir it through to slacken the chocolate. Fold the rest of the whites into the mixture with a metal spoon, until there are no white streaks left. Gently pour the batter into the prepared cake tine and bake for 45 minutes. Cool the cake in the baking tin. Serve with the remaining prunes in the syrup.
These brownies are moist with an intense chocolate taste and surprisingly, very light in texture. Store them in a sealed container at room temperature for 3 – 4 days.
100g butter 250g dark chocolate, chopped 250ml sweet potato, cooked and mashed 125ml brown sugar 250ml granulated sugar 4 eggs 7,5ml vanilla 2,5ml salt 165ml flour 125ml cocoa powder
Preheat your oven to 180℃. Line a baking tin, 18cm X 28cm or 23cm X 23cm with baking paper. Add the butter to a small saucepan and place on medium to high heat. Take the saucepan off the heat as soon as the butter starts to make small bubbles and add the chopped chocolate. Leave to stand for 5 minutes. Add the mashed sweet potato, brown sugar, granulated sugar, eggs, vanilla and salt to a mixing bowl and whisk together. Return to the butter and chocolate and whisk the mixture until the chocolate has melted and you are left with a smooth, emulsified mixture. Add the chocolate and butter mixture to the sweet potato mix and stir through. Sift the flour and cocoa powder into the same bowl and mix until incorporated. Spoon the mixture into the prepared baking tin and bake for 35 minutes or until a toothpick inserted into the cake, comes out clean. Cool the brownies completely, on a cooling rack. Store in an airtight container for 3 – 4 days, at room temperature.
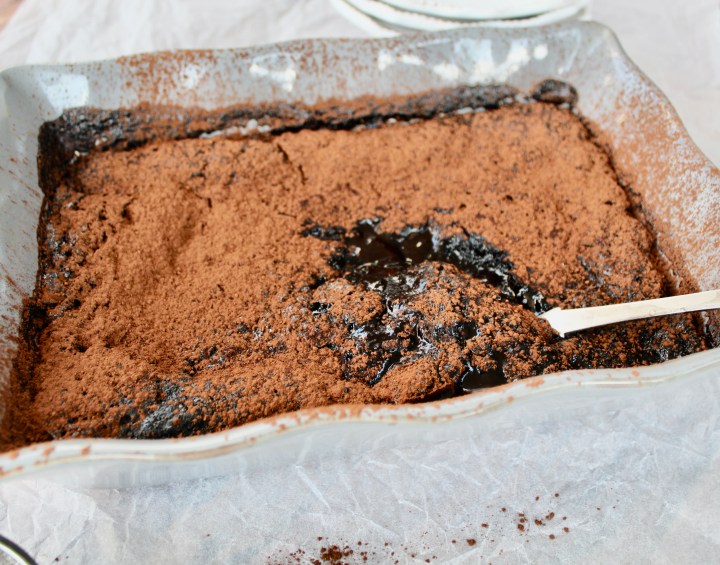
Not all things need to be pretty and with this recipe the proof IS in the pudding! Easy to make, not too sweet, fit for all seasons and a real crowd pleaser … give it a try, you will thank me!
125ml granulated sugar 45ml cocoa powder 500ml boiling water
Preheat your oven to 160℃. Sift the flour and cocoa powder into a mixing bowl and add the caster sugar. Stir the ingredients to combine and put aside. Add the melted butter, milk, vanilla and egg to a separate bowl and whisk together. Pour the wet ingredients into the bowl with the dry ingredients and stir with a spatula until just combined into a batter. Spoon the batter into a 25cm X 15cm ceramic dish and level the top with the spatula. Sprinkle the granulated sugar onto the batter in an even layer. Sift the 45ml cocoa powder onto the sugar layer and then gently pour the boiling water onto the batter. Bake the pudding for 35 minutes. Remove from the oven and stand for at least 10 minutes. Serve warm.