Hi and welcome to my blog! My name is Karen and I love cooking simple, uncomplicated, flavourful food. My cooking is inspired by seasonal ingredients, punchy flavours, an awareness of sustainability and of course by the likes and dislikes of my family and friends that sit around my table as well as you, the virtual guests around my table!
I am a chef, recipe developer and food stylist and generate my own content. I am also completely addicted to recipe books, of which I have an extremely large collection but the essence of my food is about celebrating life and all the fabulousness that we can add by creating good food.
Thank you for reading my blog. Please keep on giving me feedback and may your kitchen, as mine, be filled with joy and the best tasting food!
Slice the halloumi into fingers Add the sesame seeds to a shallow bowl and the flour to another. Roll each piece of cheese in the sesame seeds, pressing down to make them stick. Now press them into the flour to coat and place them on a plate. Add the honey and lemon juice to a small bowl and whisk together. Place a large frying pan over medium-high heat, add a splash of vegetable oil and wait for it until it is hot. Fry the halloumi in batches for 1 minute until golden brown, turning to colour evenly. Drizzle the warm fingers with the honey dressing and serve.
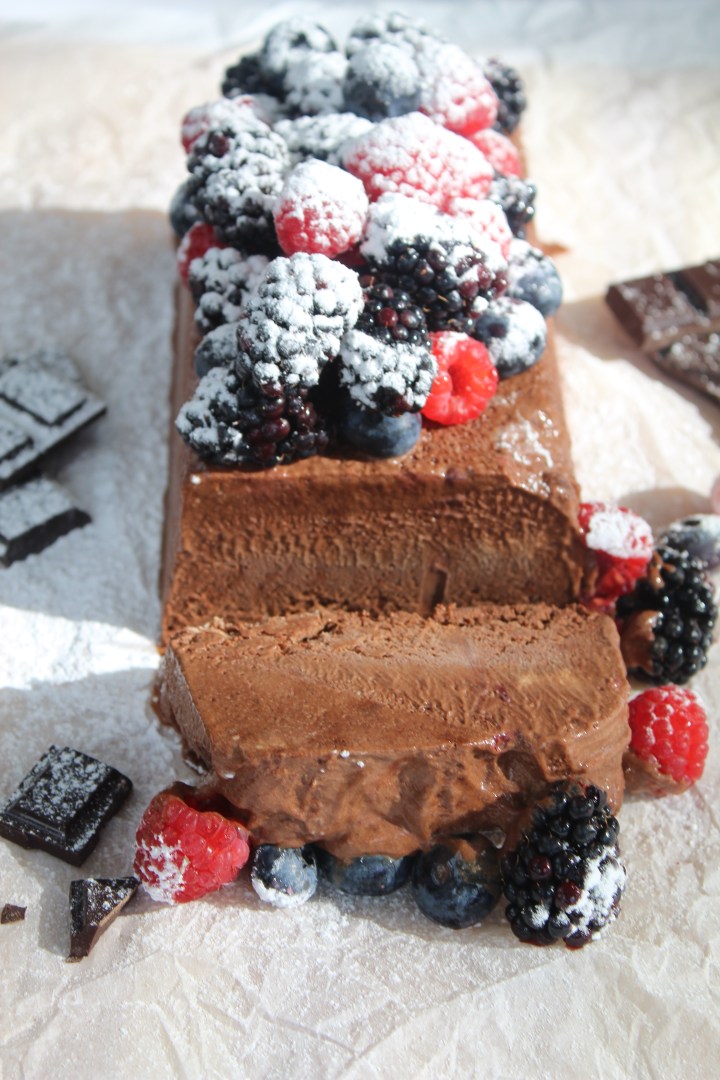
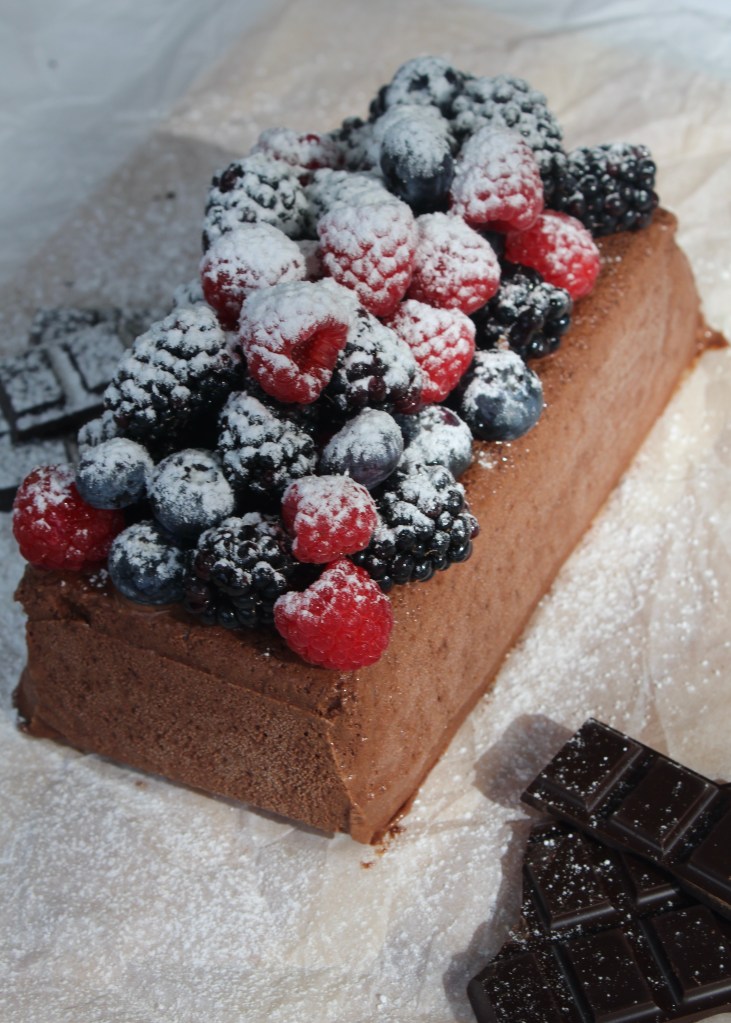
A parfait is a cream-based, frozen dessert. The difference between and ice cream and parfait is that an ice cream has air whipped into it while it freezes and a parfait has air whipped into it and only then is it frozen!! It is a bit of a cheffy dessert but follow the instructions closely and you are guaranteed a very popular dessert!!
160g dark chocolate, chopped (I use DeVilliers chocolate that has a 70% cocoa solid content!!) 6 egg yolks (make meringue/pavlova with the whites) 250g caster sugar 30ml cocoa powder 400ml double cream
300g fresh berries 30ml icing sugar
Prepare a 20cm x 11cm loaf tin by lining it with baking paper. Add the chocolate to a heatproof bowl set over a saucepan of simmering water and allow the chocolate to melt completely. Take it from the heat and set aside to cool slightly but leave the saucepan of water at a very low simmer. Add the egg yolks and sugar to a mixing bowl and beat together until combined. Pour the egg mixture into the cooled melted chocolate and put the bowl back over the saucepan with simmering water. This is the tricky part: Beat the mixture with an electric whisk for 3 minutes until the sugar has dissolved completely and you are left with a very thick mixture. You have to keep beating the mixture or the egg will cook or even worse, the chocolate will seize!! Dont despair….if you whisk continuously the mixture will be fine. Remove from the heat and sift in the cocoa powder. Fold in with a metal spoon. Pour the cream into a clean mixing bowl and whip to soft peaks. Fold the cream into the chocolate mixture in three batches. Pour the mixture into the prepared loaf tin, cover with plastic wrap and freeze overnight. Remove the parfait from the freezer about 20 minutes before you want to serve it. Turn it out onto a serving platter, remove the paper and heap the berries on top. Sift with icing sugar to serve.
This recipe feeds 6 adults as a main or 8-10 as a starter.
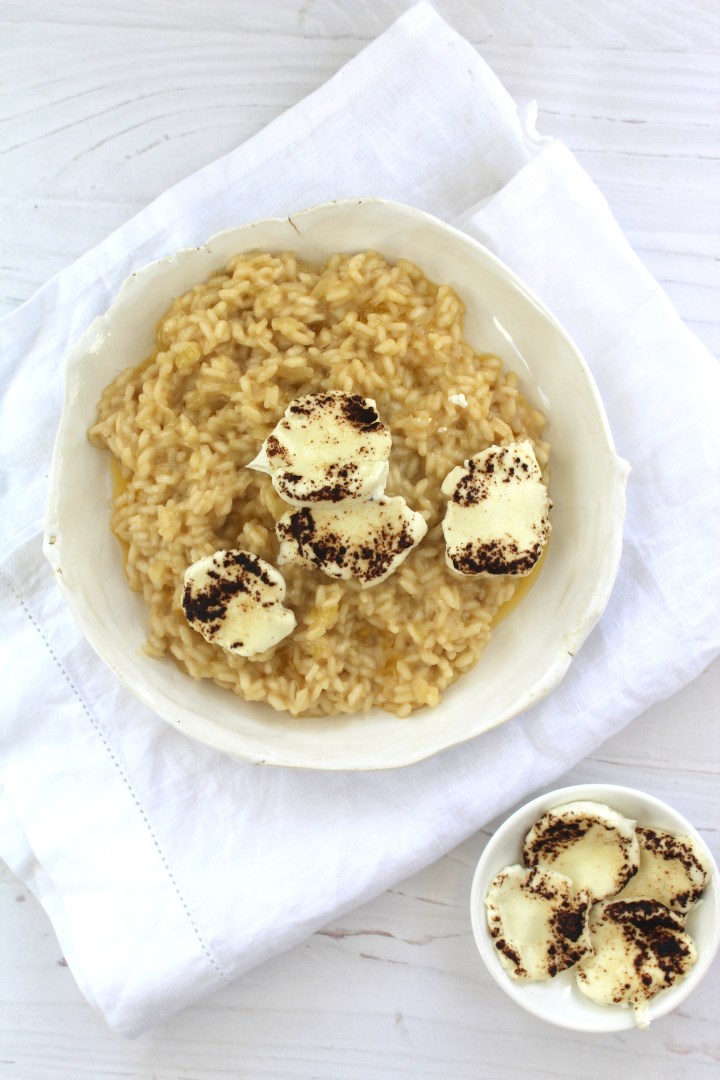
2l chicken/vegetable stock
45ml butter 45ml olive oil 1 onion, finely diced 2 cloves of garlic, minced 400g arborio rice 150ml white wine 200g goat cheese 250g parmesan cheese, grated plus extra for serving
Pour the chicken stock into a saucepan, bring to a boil and then turn the heat down to a low simmer. Add the butter and olive oil to a large, wide saucepan set over medium-high heat and wait for the pan to heat up. Add the onion and cook until translucent. Add the garlic and stir-fry for one minute. Add the rice and stir to coat with the butter and oil. Fry the rice for at least 2 minutes. Pour in the wine and keep stirring until the liquid has evaporated. Add about half a cup/two soup ladles of chicken stock and simmer until the stock is absorbed. Continue cooking the rice, adding half a cup of stock at a time, stirring constantly and allowing each addition of the stock to absorb before adding the next, until the rice is tender but still firm to the bite. Remove from the heat and stir in the parmesan cheese. Crumb half of the goat cheese into the mixture and stir through. Slice the other half of the goat cheese into wheels and brûlée with a blow torch until charred. Place the goat cheese on the risotto, add some extra butter and serve immediately.
These biscuits have a crackly crust and a heavenly chewy, fudge centre and will become one of your favourite chocolate treats! Make sure to bake these with a good quality chocolate with at least 70% cocoa solids.
220g dark chocolate, finely chopped (I used coffee flavoured chocolate, you don’t have to but do make sure that your chocolate has at least 70% cocoa solids) 90ml butter, melted 190ml brown sugar 62ml white sugar 2 eggs 190ml flour 60ml cocoa powder, sifted 10ml espresso coffee powder 1,2ml salt
Preheat your oven to 180℃ and line 2 baking sheets with baking paper. Add the chocolate and butter to a heatproof bowl set over a saucepan of simmering water. Stir every now and then until the chocolate is melted and the mixture has amalgamated. Take the bowl from the heat and set aside. Add the eggs, brown sugar and white sugar to the bowl of a stand mixer fitted with the paddle attachment. Beat the mixture together at high speed for 3 – 4 minutes. Turn the mixer speed down to low and pour in the chocolate mixture with the machine running. Add the flour, sifted cocoa powder, baking powder and salt to a mixing bowl and stir together until well mixed. Remove the mixing bowl from the stand mixer and add the dry ingredients. Fold through with a spatula. Spoon about 15ml of the batter onto the prepared baking sheet, leaving room for the biscuits to spread. Bake for 10 minutes. Cool the biscuits on the baking sheet before storing/serving.
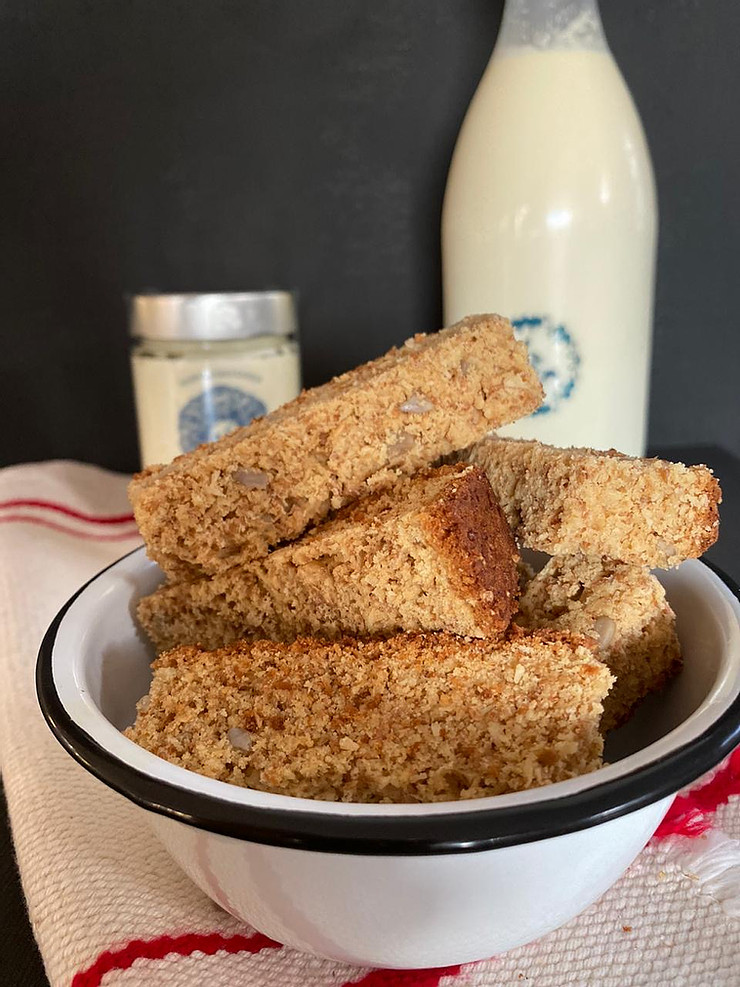
I find few things as comforting as a full jar of rusks. It makes for the perfect breakfast with a cup of tea, it serves as a convenient snack in between meals and most of all, I feel that I have provided and put on display, a healthy and delicious snack.
I cut my rusks quite thin – literally like fat fingers! – as my one daughter eat these as one would biscotti!
The recipe makes about 90 pieces which keep for two months in other homes, not in mine!
500g butter
375ml brown sugar
1kg self raising flour
15ml baking powder
10ml salt
500ml digestive bran
500ml desiccated coconut
100ml sunflower seeds
500ml buttermilk
2 eggs
Preheat your oven to 190℃.
Melt the butter in a small saucepan, add the sugar and stir occasionally so that the sugar dissolves. Take off the heat and put aside.
Sift together the flour, salt and baking powder in a large mixing bowl.
Add the bran, coconut and sunflower seeds and give the ingredients a stir through.
Add the slightly cooled butter and sugar mixture and mix well with a spatula.
In a separate jug, whisk together the eggs and buttermilk.
Add the wet ingredients to the dry ingredients and give the mixture another good stir through.
Spray/grease 2 standard roasting trays or baking tins of similar size.
Divide the mixture between the two trays and press firmly down in the trays.
Bake for 50 minutes until golden brown.
You will now be left with what looks like two pans of sheet cakes. Let them cool for 10 minutes after removing them from the oven and then take them out of the roasting trays. Let them cool completely.
Now turn your oven onto 50℃.
Slice into finger sized rusks and pack them half a centimetre apart on a flat baking sheet so that the warm air from the oven can circulate in between and dry your rusks evenly.
It depends on the weather, but I usually dry mine for about 3 hours.
Cool completely and proudly pack the rusks into a beautiful glass jar, and put on display in your kitchen.
170ml condensed milk 30ml matcha powder 360g white chocolate, chopped 2,5ml salt 2,5ml vanilla
Prepare a 20cm x 20cm baking tin by lining it with baking paper. Pour the condensed milk into a small saucepan and sift the matcha powder over it. Place the saucepan on a low heat and stir until the mixture is hot. Add the white chocolate, salt and vanilla. Turn the heat down to the lowest setting and stir continuously until the chocolate has melted completely. Pour the mixture into the prepared tin and leave to cool completely. Refrigerate the fudge for 3 hours or longer. Slice the fudge and sift over some matcha powder.
Preheat your oven to 180℃. Wash the potatoes and bake them in the oven until cooked. Remove and set aside. Heat the oil in a large saucepan set over medium-high heat. Add the beef and cook until golden brown and any liquid has evaporated. Add the onion, garlic and tomato paste and cook for a few minutes while stirring. Sprinkle with the flour and add the Worcestershire sauce and beef stock. Bring to the boil while stirring. Cover, turn the heat down slightly and simmer for 30 minutes. If the mixture becomes too dry, add a little water. Season the beef with salt and pepper and set aside. Turn your oven up to 220℃. Cut the potatoes in half lengthwise and scoop out the flesh, leaving about 0,5cm of potato still stuck to the skin. Place the potato flesh in a bowl and mash until smooth. Add the butter and nutmeg and mix through. Season with salt and pepper. Spoon the mashed potato into a piping bag. Spoon some of the beef into the hollowed potato and pipe some mashed potato over the beef. Place the potatoes in a baking dish and bake in the oven until warm and golden on top. Serve with a fresh salad.
90ml Biscoff spread 300ml cream, cold (60ml Biscoff spread, if you want a sauce to drizzle over the mousse)
Measure the Biscoff spread into a small bowl and microwave for 30 seconds. Give it a good stir and wait for the melted spread to cool down and come to room temperature. (when you can not feel a temperature difference when dipping your finger into it!!!) Pour the cream into a mixing bowl and whisk until you have stiff but not dry peaks. Pour the room temperature spread onto the whipped cream and very gently but thoroughly fold it through until no streaks are visible. Refrigerate the mousse for an hour. Pipe/scoop into glasses and serve.
Drizzle sauce: Microwave about 60ml of the spread for 30 seconds, until melted. Stir the mixture and stand at room temperature for about 15 minutes. Drizzle over the mousse before serving.
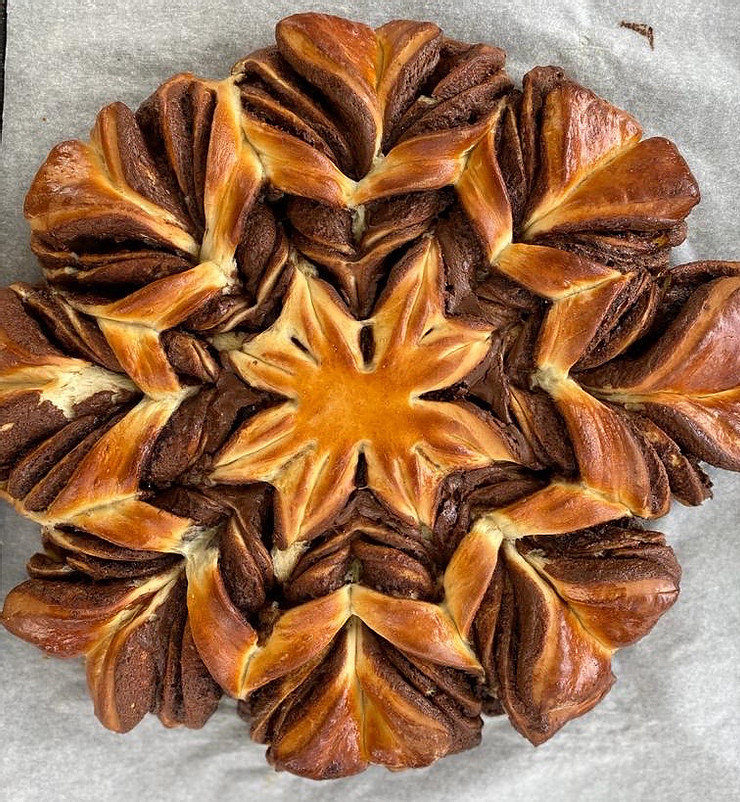
If you long for slightly warm pain au chocolat directly from a Paris pâtisserie, long no more! This chocolate bread offers real competition! If you battle to understand the finishing instructions, go to my instagram account (karen_claassen) or my YouTube channel, for a demonstration video.
300ml milk
30ml butter
10g instant yeast
80ml sugar
a pinch of salt
850ml cake flour
2 egg yolks
350g chocolate spread
2 egg whites
Put a small saucepan onto the heat and warm the milk in it.
Stir the butter into the milk so that it can melt.
Allow the milk to come to a temperature where you can comfortably keep your finger in it without feeling it is hot.
Sprinkle the yeast onto the milk and give it a good stir. Set aside for 5 minutes or so.
Add the sugar, salt and flour to a large mixing bowl.
Add the yeast mixture as well as the egg yolks and mix to form a rough dough.
Transfer the dough to a floured surface and knead for 10 minutes, until smooth and elastic.
Cover the bowl with plastic wrap and leave to stand until doubled in volume.
Preheat your oven to 180℃.
Line a large baking sheet with parchment paper.
Transfer the dough to a work surface and divide it into four equal pieces.
Roll the first portion of dough into a circle – I like to measure my circle with the loose-bottom of a 22cm cake tin. This is a real help in getting all the circles/discs to the same size.
Transfer this dough circle onto your prepared baking sheet and spread a third of the chocolate spread as evenly as you can over the dough.
Repeat this process with the other three portions of dough.
Once the last dough circle has been placed onto the stack, you are ready to cut and shape your bread. If you have difficulty in following this process, go to my instagram account or my YouTube channel for demonstration video.
Finishing instructions:
Imagine a 5cm diameter circle as the centrepiece of your dough circles – DO NOT cut through this circle.
Now, if the dough circles were a clock, make an incision from the centre circle on 12 o’clock, 6 o’clock, 3 o’clock and 9 o’clock.
Half each of the four triangles you have so that you are left with 8 pieces.
Lastly, cut through each of the 8 pieces to end up with 16.
Now lift two pieces that are next to each other, one in each hand, and make two twists in opposite directions. Carefully place these pieces down. Keep going until all of the bread pieces have been twisted and your have a beautifully patterned bread.
Cover the bread with a clean tea towel and allow it to rest for 10 minutes.
Whisk the two egg whites with a fork and glaze the bread with it.
Preheat your oven to 180℃ and prepare a 22cm loose-bottom cake tin by spraying it with cooking spray and sprinkling the bottom and sides with breadcrumbs. Set a large saucepan with salted water over high heat and add the cauliflower florets. Cook until very soft. Drain the cauliflower, making sure that you get rid of as much moisture as possible and add it to a mixing bowl. Add the parmesan cheese, cornstarch and eggs and season with salt and pepper. Mix well. Fry the bacon pieces until slightly crispy on the edges. Now spoon half the cauliflower mixture into the prepared cake tin and spread it evenly. Add half the grated mozzarella, the bacon and the other half of the mozzarella. Spoon in the rest of the cauliflower mixture and even it out. Sprinkle the top with the dried breadcrumbs and drizzle some olive oil over the cake. Bake for 30 minutes. Stand the cauliflower cake for 15 minutes before unmoulding it to serve.